
- type
- ownership
- move
- borrowing
- copy
- references
- lifetime
- pointers
- collections
- struct
- enum
- match
- module
- error
- traits
- input output
- threads
- async
- closure
- Iterator
- macros
- unsafe
type
- 不变:一旦一个变量绑定了一个值,就不能被绑定到其他值上面
- 可变:该变量可以被绑定到其他值上
- 不变 vs. shadowing:shadowing 相当于创建了一个新的变量
- 静态语言:编译时就要知道所有变量的类型
- 标量:整型(有符号和无符号都支持),浮点(f32 和 f64),布尔,字符(注意:不是字符串)
- 复合类型:tup, array(stack上,固定长度)
- 字符串常量(string literal)vs. String 类型:前者在栈上?(运行期不可变),后者在堆上(运行期可变)
- const 和 变量的区别:
- const 是编译期可决定的值(或表达式)
- 可以在函数之外定义一个 const,在 module 的范围内使用这个 const
- const 更快
- type 关键字:给某个类型声明一个新的名字。例如:
1
2
3
4
5
6
7
8
9
10
11
#![allow(unused)]

type Bytes = Vec<u8>;

fn decode(data: &Bytes) {
    //...
}

// 给每个 module 定义一个 Result 的 alias
// 一般来说,某个 module 内,使用同一个 Error,使用这种 alias 就可以简化 Result 的书写
pub type Result<T> = result::Result<T, Error>;
ownership
Note:「变量」(variable)拥有「值」(value)
所有权(ownership)3 原则:
- Rust 中每一个值都有一个称之为其「所有者」(owner)的「变量」
- 「值」有且只能有一个所有者(「变量」)
- 当所有者(「变量」)离开作用域,这个「值」将被丢弃,同时其资源也被释放
思考:使用 C 语言的时候,如果遵循这 3 个原则来使用指针?
对复合数据结构,所有权可以是「树状结构」。例如:
1
2
3
4
5
6
7
8
9
10
11
12
13
14
15
16
17
18
19
20
21
22
23
24
#![allow(unused)]

fn main() {
    // 定义一个 struct:Person
    struct Person {
        name: String,
        birth: i32
    }

    // 使用 let 来创建值或者资源,同时该「变量」成为「值」的 owner
    // 一个 Person 的 Vector
    let mut composers = Vec::new();

    // Vector 中放入 3 个 structs
    composers.push(Person { name: "Palestrina".to_string(), birth: 1525 });
    composers.push(Person { name: "Dow".to_string(), birth: 1563 });
    composers.push(Person { name: "Lully".to_string(), birth: 1632 });

    // composers 是所有权树的 root,其拥有 3 个 structs
    // 每个 struct 又拥有 2 个字段
    // struct 中的字段 name,又拥有其对应的「值」(文本内容)
    // 从而形成了一个「所有权树」
}
// 离开作用域,从所有权树的 root 节点 composers 开始释放整个树
另外一个例子,使用了 Box 类型:
1
2
3
4
5
6
7
8
#![allow(unused)]

fn main() {
    // A Box<T> is a pointer to a value of type T stored on the heap
    // Box::new 在 heap 上给一个 tuple 分配空间,然后指向分配的空间的指针
    let point = Box::new((0.625, 0.5));
}
// 离开作用域,释放 head 上分配的空间
除了上面的基本规则,ownership 还有几个扩展概念,这里只提一下,后面的章节会深入细节:
- 可以把「值」从一个 owner 移交给另外一个 owner,也就是 move
- 一些简单类型(Integer,char),默认不遵守所有权规则,这些类型统称为 Copy Type
- 利用 Rc,Arc 等指针机制,一个「值」可以有几个 owners
- 除了 own 一个值,Rust 还提供了另外一种机制来访问值:borrow
move
- move:把「值」的所有权转移给另外一个「变量」(owner)
- 赋值(=),传递「函数参数」,返回「函数返回值」都会发生 move
- 一旦某个「变量」的所有权转移(move)走了以后,该「变量」失效,不能再使用这个「变量」
- 例如:在【函数】和【闭包】中,在入参是 move 的场景(而不是 borrow 的场景),进入函数后,参数和返回值的 owner 关系发生改变,原先的变量不再有效
- 可以通过实现 Copy trait 把默认的 move 改成 copy(复制,类似深拷贝)
- Rust 中,一些简单类型,默认实现了 Copy trait,这些类型统称为 Copy Type
- Copy trait 继承了 Clone trait
一个函数入参是 move 的例子:
1
2
3
4
5
6
7
8
9
10
11
12
13
14
15
fn main() {
    let s1 = String::from("abc");

    // 该字符串的 ownership 被 move,之后 s1 失去了这个字符串的 ownership,s1 不再有效
    let len = calculate_length(s1);
    // 不能再使用 s1(已经发生了 move)
    println!("The length is {}.", len);
}

// move
fn calculate_length(s: String) -> usize {
    // 函数内部拿到了这个字符串的 ownership
    s.len()
    // 当函数结束的时候,这个字符串被 dropped
}
- 和大部分类型不同,Copy Type(例如:integers,整型)不使用 move 规则,而是进行 copy。例如:
1
2
3
4
5
6
7
8
9
10
11
12
13
14
15
#![allow(unused)]

fn main() {
    // copy
    let x = 5; // bind the value 5 to x
    let y = x; // make a COPY of the value in x and bind it to y

    // move
    let s1 = String::from("hello");
    let s2 = s1; // s1 was moved into s2。之后 s1 不再有效

    // clone
    let s1 = String::from("hello");
    let s2 = s1.clone();
}
其它一些要点:
- 不能把 Vector 中的单个 element move out。例如:let third = v[2]
- 这种场景可以使用 borrow。除了 move 之外,还可以 borrow 一个「值」(后面会详细说)
borrowing
借用 (borrowing):对函数参数来说,如果不想 ownership 发生变化可以利用引用(reference)。下面给一个简单的例子:
1
2
3
4
5
6
7
8
9
10
11
12
13
14
15
fn main() {
    let s1 = String::from("hello");

    // 把 s1 的引用(&s1)作为参数传给函数,这样就可以达到 borrowing 的效果:s1 对这个字符串值的 ownership 不变
    let len = calculate_length(&s1);
    // s1 依旧是这个字符串值的 owner,可以使用
    println!("The length of '{}' is {}.", s1, len);
}

// 借用:使用引用(&String)作为函数的入参
fn calculate_length(s: &String) -> usize {
    // 函数内部使用引用 s(borrowing 到一个字符串的值)
    s.len()
    // 当函数结束的时候,这个引用 s 本身(s 本身也是类型为引用的值)被 dropped
}
- 要想在函数内部修改借用的参数的值,需要利用「可变引用」:
1
2
3
4
5
6
7
8
9
fn main() {
    let mut s = String::from("hello");

    change(&mut s);
}

fn change(some_string: &mut String) {
    some_string.push_str(", world");
}
NOTE:
为啥不需要对这个可变引用进行 deference(类似 C 语言中的 * 操作符)?
(*some_string).push_str(“, world”);
这是因为在「method」或者「field」上的 . 操作符可以自动 deference 引用。也就是说在这种场景,不需要区分是引用还是值,直接使用 . 操作符就行了:
some_string.push_str(“, world”);
但对于其他场景,还是需要进行 deference,例如:
(*some_string) = String::from(“new string it”);
copy
默认是 copy 而不是 move 的类型有:
- integer
- floating-point numeric
- char
- bool
- A tuple or fixed-size array of Copy types is itself a Copy type
references
- 定义:The &s1 syntax lets us create a reference that refers to the value of s1 but does not own it
- 翻译:s1 是一个值;而 &s1 就是指向这个值的「引用」(但并不 own 这个值)
- Rust 提供了「引用」这种方式来 access 一个 value:可使用 value,但不 own 这个 value。又分为 2 种「引用」:
- &T;「shared 引用」;多个 「shared 引用」可共享同一个 value,但不能修改这个 value
- &mut T;「可变引用」;不能共享同一个 value,但可以修改这个 value
和普通类型一样,引用实际上也是类型:
- i32:一个整数类型(32 位)
- &i32:一个指向 i32 的不变引用类型
- &mut i32:一个指向 i32 的可变引用类型
引用两原则:
- At any given time, you can have either (but not both of) one mutable reference or any number of immutable references
- 在给定作用域中的给定值有且只有一个「可变引用」
- if we have an immutable reference to something, we cannot also take a mutable reference
- References must always be valid
- 值的生命周期必须比指向它的引用的生命周期大(outlives)
- 如果被引用的值失效了(被 drop 掉),这个引用也就失效了
- 在给定作用域中的给定值已经存在引用,也不能对一个值的 owner 进行 move:因为一旦对这个值的 owner 进行 move 操作,这个值就会被 drop 掉,就导致这个值上的引用失效
注意
引用原则中的【作用域】指的是:从创建开始,一直持续到它最后一次使用的地方,而不是从创建持续到某一个花括号
请仔细对比以下 2 个例子,一个【合法】,一个【非法】:
【合法】:
1
2
3
4
5
6
7
8
9
10
11
12
13
14
15
16
#[allow(unused_assignments)]
fn main() {
    // 变量 s 对该 String 值有 ownership
    let mut s = "12345".to_string();

    // r 是到 s 的「可变引用」,或者可以说:“引用 r is a borrow of 变量 s”
    let r = &mut s;

    //【合法】:使用「可变引用」 r 对值进行修改
    // 而且这里是 r 【最后一次】被使用的地方
    r.push_str("67890");

    //【合法】:因为这里已经不是引用 r 的作用范围(已经在最后一次使用之后了)
    // 所以满足原则:“在给定作用域中的给定值已经存在引用,也不能对一个值的 owner 进行 move”
    s = String::from("123456789012345");
}
【非法】:
1
2
3
4
5
6
7
8
9
10
11
12
13
14
15
16
17
18
#[allow(unused_assignments)]
fn main() {
    // 变量 s 对该 String 值有 ownership
    let mut s = "12345".to_string();

    // r 是到 s 的「可变引用」,或者可以说:“引用 r is a borrow of 变量 s”
    let r = &mut s;

    //【合法】:使用「可变引用」 r 对值进行修改
    r.push_str("67890");

    //【非法】:因为这里还在引用 r 的作用范围之内(之后还使用了 r.len,不是【最后一次】被使用)
    // 所以违反了原则:“在给定作用域中的给定值已经存在引用,也不能对一个值的 owner 进行 move”
    s = String::from("123456789012345");

    // r 还在被使用
    r.len();
}
总之:
owner 和 可变引用的根本区别就在于 owner 会负责值的 drop(释放);这个区别也就决定了一旦值上存在引用,就要小心的使用 owner,要保证这个值要始终有效,不要被释放,否则 Rust 的编译器会提示失败。
另外,Rust 中,可以「引用」到任意的表达式,包括「值」,例如:
1
2
3
4
5
6
7
8
9
fn factorial(n: usize) -> usize {
    (1..n + 1).product()
}

let r = & factorial(6);

// Arithmetic operators can see through one level of references.
// 可以是 r + &1009 这种形式
assert_eq!(r + &1009, 1729);
上面的例子中,Rust 会创建一个「匿名变量」来 hold 这个表达式的「值」,然后让这个「引用」指向这个「匿名变量」,而这个「匿名变量」也有它自己的生命周期。
lifetime
【生命周期】原则:一个引用的生命周期不能超过其引用的变量的有效期
- Rust 中,【生命周期】的概念只和变量的引用有关;Rust 中所有的引用都会关联一个「生命周期」
- 【生命周期】是程序可以安全使用这个引用的一个范围
- 【生命周期注解】告诉 Rust 多个引用的生命周期如何相互联系
函数定义使用生命周期注解
先给一个在函数中使用生命周期注解的例子:
- 告诉 Rust 这 3 个引用的【生命周期】的关系;返回值的生命周期和「两个入参」的生命周期相同:
1
2
3
4
5
6
7
fn longest<'a>(x: &'a str, y: &'a str) -> &'a str {
    if x.len() > y.len() {
        x
    } else {
        y
    }
}
编译时,会检查其是否符合生命周期原则:
1
2
3
4
5
6
7
8
9
fn main() {
    let string1 = String::from("long string is long");

    {
        let string2 = String::from("xyz");
        let result = longest(string1.as_str(), string2.as_str());
        println!("The longest string is {}", result);
    } // 内层代码块的结束
}
检查过程如下:
- 这里 2 个入参的生命周期 ‘a,是 string1 和 string2 这 2 个参数作用域重叠的部分(内层代码块的结束之前)
- 返回值 result 的生命周期也是 ‘a(string1 和 string2 这 2 个参数作用域重叠的部分)
- 那么 println! 使用 result 的时候,’a 是有效的(内层代码块的结束之前),所以符合生命周期原则
再来一个不符合生命周期原则的例子:
1
2
3
4
5
6
7
8
9
fn main() {
    let string1 = String::from("long string is long");
    let result;
    {
        let string2 = String::from("xyz");
        result = longest(string1.as_str(), string2.as_str());
    }
    println!("The longest string is {}", result);
}
- 这个例子中返回值 result 的生命周期也同样是:string1 和 string2 这 2 个参数作用域重叠的部分
- 但 println! 使用 result 的时候,已经超出了 ‘a 的有效范围(内层代码块的结束之后),所以不符合生命周期原则
结构体的生命周期注解
- 结构体的生命周期注解:结构内有引用的话,结构体本身的生命周期必须和其中引用的对象的生命周期保持一致
1
2
3
4
5
6
7
8
9
10
11
12
13
#![allow(unused)]

struct ImportantExcerpt<'a> {
    part: &'a str,
}

fn main() {
    let novel = String::from("Call me Ishmael. Some years ago...");
    let first_sentence = novel.split('.')
        .next()
        .expect("Could not find a '.'");
    let i = ImportantExcerpt { part: first_sentence };
}
最后详细分析一个生命周期的例子。
先定义一个结构体 S:
1
2
3
4
struct S<'a> {
    x: &'a i32,
    y: &'a i32
}
然后在下面这段代码中使用这个结构体(具有 2 层代码块):
1
2
3
4
5
6
7
8
9
fn main() {
    let x = 10;
    let r;
    {
        let y = 20;
        let s = S { x: &x, y: &y };
        r = s.x;
    } // 内层代码块的结束
} // 外层代码块的结束
检查过程如下:
- 结构体 S 的 2 个引用字段有相同的生命周期 ‘a
- 这个例子中,生命周期 ‘a 为变量 x 和 y 的重叠部分(也就是内层代码块的结束)
- 变量 s 的生命周期也要和这 2 个字段的生命周期 ‘a 相同,所以变量 s 的生命周期也必须是 x 和 y 这 2 个变量的重叠部分(也是内层代码块的结束)
- 但 r = s.x 这个赋值语句要求 s 生命周期 ‘a 也必须能涵盖 r 的生命周期(也就是说 ‘a 不能比 r 先结束而失效)
- 但实际上 r 的有效期需要到外层代码块结束
- 最终检查结果是:不符合「生命周期原则」
解决方法是修改结构体 S 的定义:
1
2
3
4
struct S<'a, 'b> {
    x: &'a i32,
    y: &'b i32
}
pointers
实际上,Rust 中的 Smart Points(以及常用 Traits)就是给开发人员提供了 Rust 中一些惯用模式。
Rust 中的指针有 3 种:
- 【引用】:Rust 中安全的指针。也就是【非所有权指针】,分 &T 和 &mut T 两种。其中 &T 本身是一种 Copy 类型;而 &mut T 并没有实现 Copy Trait(Copy trait 的细节请参考其他小节)
- 【原始指针】:也就是 Raw Points,用于 unsafe 代码;这里不详细介绍了
- 【智能指针】:智能指针的 2 个关键 trait:Drop(离开作用域后,自动释放资源) 和 Deref。标准库提供了几种智能指针:Box<T>,Rc<T>,Arc<T>,Cell<T>,RefCell<T>
下面是对其中一些【智能指针】的介绍。
Box
使用 Box 的例子:
1
2
3
4
5
6
7
8
9
10
11
12
13
#![allow(unused)]

fn main() {
    let x = 42;
    let y = Box::new(84);

    {
        let z = (x, y);
    } // 该 scope 结束后,不但 z 被释放,而且 y 也被释放(因为 y 这个变量是用 Box::new 来初始化的,所以用 y 来构建 z 的时候是 move,而不是 copy)

    let x2 = x; // 能通过生命周期检查
    let y2 = y; // 不能通过生命周期检查,因为 y 已经被释放
}
既然 Box 用于把数据存储在「堆」(heap)上,那么 Box 常常被使用在以下场景:
- 在编译时,无法确认数据 size 的场景
- 不关心当前「对象」具体的「类型」,而是只关心它实现了什么 Trait
下面是一个例子:
1
2
3
4
5
// 错:这个定义是不能通过编译的。因为 List 的这个定义是递归的,在编译期间不能决定 List 的 size
enum List {
    Cons(i32, List),
    Nil,
}
改用 Box 可通过编译:
1
2
3
4
enum List {
    Cons(i32, Box<List>),
    Nil,
}
Rc
如果上一节例子中的某个 List 节点被多个 List 指向怎么办?如果还是使用 Box 指针不能通过编译:
1
2
3
4
5
6
7
8
9
10
11
12
13
14
15
#![allow(unused)]

enum List {
    Cons(i32, Box<List>),
    Nil,
}

fn main() {
    let a = Cons(5, Box::new(Cons(10, Box::new(Nil))));
    // b 获取到了 a 的「所有权」
    let b = Cons(3, a);

    // 错:这里不能通过编译,a 的「所有权」已经被 b 占有
    let c = Cons(4, a);
}
这种场景需要使用 Rc(单个 value 可以有多个 owners):
1
2
3
4
5
6
7
8
9
10
11
12
13
14
15
16
17
#![allow(unused)]

use std::rc::Rc;

enum List {
    Cons(i32, Rc<List>),
    Nil,
}

fn main() {
    let a = Rc::new(Cons(5, Rc::new(Cons(10, Rc::new(Nil)))));
    // b 获取到了 a 的「所有权」,引用计数 +1
    let b = Cons(3, Rc::clone(&a));

    // c 也获取到了 a 的「所有权」,引用计数 +1
    let c = Cons(4, Rc::clone(&a));
}
其他使用 Rc 的例子:
1
2
3
4
5
6
use std::rc::Rc;

// Rust can infer all these types; written out for clarity
let s: Rc<String> = Rc::new("hello it".to_string());
let t: Rc<String> = s.clone();
let u: Rc<String> = s.clone();
A value in an Rc box is always shared and therefore always immutable.
翻译:Rc 中的 value 总是被共享的值,也就是说,这个 value 是「不可变的」,可读但不可写。
RefCell
为了解决「内部可变」(interior mutability )问题,可以使用 RefCell 指针。
所谓 interior mutability 问题持有不可变引用又需要修改其中的 value(而不像 Rc 中的值是「不可变的」)。
正常来说,不能对「不变量」进行「可变引用」:
1
2
let x = 5;
let y = & mut x; // 编译错:不能对「不变量」进行「可变引用」
但有时候,开发人员需要对一个不变引用中的 value 做可变(修改这个 value 的值),这时候就可以使用 RefCell。
例如,要实现一个 trait,该 trait 的定义如下:
1
2
3
4
pub trait Student {
    // 用于接收老师消息,注意这里的 &self 是不可变引用
    fn on_message(&self, msg: &str);
}
on_message 的定义限制了 self 是「不可变」的,但我们又希望在 on_message 中改变。那么解决方法如下:
1
2
3
4
5
6
7
8
9
10
11
12
13
14
15
16
17
18
19
20
use std::cell::RefCell; // 从标准库中引入

struct Boy {
    messages: RefCell<Vec<String>>, // messages 的类型为 RefCell
}

impl Boy {
    fn new() -> Boy {
        Boy {
            messages: RefCell::new(vec![])  // 将 vec 保存在 RefCell 中
        }
    }
}

impl Student for Boy {
    fn on_message(&self, message: &str) { // self 仍然是不可变引用
        // 在运行时借用可变引用类型的 messages
        self.messages.borrow_mut().push(String::from(message));
    }
}
RefCell 中包含一个可变引用(mut reference)。
RefCell<T> is a generic type that contains a single value of type T. RefCell supports borrowing references to its T value:
RefCell::new(value)。Creates a new RefCell, moving value into it.ref_cell.borrow()。Returns aRef<T>, which is essentially just a shared reference to the value stored in ref_cell. This method panics if the value is already mutably borrowedref_cell.borrow_mut()。Returns aRefMut<T>, essentially a mutable reference to the value in ref_cell. This method panics if the value is already borrowedref_cell.try_borrow(), ref_cell.try_borrow_mut()。Work just like borrow() and borrow_mut(), but return a Result. Instead of panics if the value is already mutably borrowed, they return an Err value
一个例子:
1
2
3
4
5
6
7
use std::cell::RefCell;
let ref_cell: RefCell<String> = RefCell::new("hello".to_string());
let r = ref_cell.borrow(); // ok, returns a Ref<String>
let count = r.len(); // ok, returns "hello".len()
assert_eq!(count, 5);
let mut w = ref_cell.borrow_mut(); // panic: already borrowed
w.push_str(" world");
其实 RefCell 的使用规则和普通的「引用」基本一致,唯一的区别就是使用普通「应用」时违反规则的话,会在「编译期」给出错误提示;而使用 RefCell 违背规则的话,会在运行时 panic。
另外:
将
Rc<T>和RefCell<T>结合使用来实现一个拥有多重所有权的可变数据。但这种做法不是线程安全的,常用于用 Rust 刷算法题,并不会用到工程上。
总之,RefCell 提供了一种在编译期间绕过 Rust 不变性检查的方法;但同时也付出了复杂性的代价。
array
Rust 中表示内存中连续的值的序列的类型有 3 种:
- Array:
[T; N] Vector:Vec<T>Slice:&[T]和 `&mut [T]
这 3 种形式中
v[i]都代表的是第 i 个元素。
这里介绍 Array(Vector 的介绍放到后面一节):
[T; N]表达的是有 N 个值的数组,且该数组中的每个元素的类型是 T[T; N]形态的数组必须在编译期就决定该数组的大小和类型,同时该数组的大小不能再变化
这里也先提一下 Slice:
&[T]和&mut [T]表达的是另外一个内存中连续的值的序列(Array 或 Vector)的 slice
collections
- collections 存放的是指向 heap 上的数据的指针的集合(和 array/tuple 不一样):
- vector:可变长度,并且存放同种类型的元素
- string:Rust 标准库提供了 String 类型
- hash map
vector
- 一些创建 vector 的例子:
1
2
3
4
5
6
7
8
9
10
11
12
13
14
15
16
#![allow(unused)]

fn main() {
// 使用 vec! macro
    let mut primes = vec![2, 3, 5, 7];
    // 变长
    let mut z = vec![0; rows * cols];

// 使用 Vec::new
    let mut pal = Vec::new();
    pal.push("step");

// 使用 iterator
    let v: Vec<i32> = (0..5).collect();
    assert_eq!(v, [0, 1, 2, 3, 4]);
}
- 容量不等于 vector 的当前面 size:
1
2
3
4
// capacity 是 2,但 size 是 0
let mut v = Vec::with_capacity(2);
assert_eq!(v.len(), 0);
assert_eq!(v.capacity(), 2);
- 两种方法获取 vector 中的某个元素
- let does_not_exist = &v[100]; // 直接 panic,如果数组的 size 小于 100
- let does_not_exist = v.get(100); // 返回 None,如果数组的 size 小于 100
- 下面代码编译时直接报错:first 是不变引用;但 push 的时候发生的 borrow 行为:编译失败。
1
2
3
4
5
6
7
fn main() {
    let mut v = vec![1, 2, 3, 4, 5];

    let first = &v[0];

    v.push(6);
}
遍历 vector,并修改其中的值:
1
2
3
4
5
6
fn main() {
    let mut v = vec![100, 32, 57];
    for i in &mut v {
        *i += 50;
    }
}
如果一个 vector 中需要存不同类型的值,可以利用 Enum 类型来实现:
1
2
3
4
5
6
7
8
9
10
11
12
13
fn main() {
    enum SpreadsheetCell {
        Int(i32),
        Float(f64),
        Text(String),
    }

    let row = vec![
        SpreadsheetCell::Int(3),
        SpreadsheetCell::Text(String::from("blue")),
        SpreadsheetCell::Float(10.12),
    ];
}
总之,Rust 必须在编译期确定 vector 中的数据的类型。
slices
slice([T])是 array 或 vector 中的一部分;可能是 array,也可能是 vector,总之是一段连续的数据的引用。
最后再说一下数组的 move
数组(或 vector)中的元素是不能被 move 的:
1
2
3
4
5
6
7
8
9
// Build a vector of the strings "101", "102", ... "105"
let mut v = Vec::new();
for i in 101..106 {
v.push(i.to_string());
}

// 错:Pull out random elements from the vector.
let third = v[2]; // error: Cannot move out of index of Vec
let fifth = v[4]; // here too
如果要对数组(或 vector)中的元素做 move,需要专门的函数,例如:pop、swap_remove、std::mem::replace……
另外,把数组(或 vector)中的元素 move 出来也叫做 consume (消费)。例如,对 vector 中的所有元素进行「消费」:
1
2
3
4
5
6
let v = vec!["aaa".to_string(), "bbb".to_string(), "ccc".to_string()];

for mut s in v {
s.push('!');
println!("{}", s);
}
上面的循环中,把 v 中的元素逐个 move 给 s,每次 s 拥有 v 的元素,并进行操作。
最后看一个技巧:
1
2
3
4
5
6
7
8
9
10
11
12
// 数组中元素中有 Option
struct Person {
    name: Option<String>,
    birth: i32
}

let mut composers = Vec::new();
composers.push(Person { name: Some("Palestrina".to_string()),
birth: 1525 });

// 用 take 方法把 Option 的值 move 出来,而数组中留下一个 None
let first_name = composers[0].name.take();
hash map
- Rust 中使用 std::collections::HashMap 来表示 1 对 1 的关系。
- Rust 的 Map,所有的 key 必须为相同的类型。所有的 value 必须为相同的类型。
创建一个 map 来记录 2 个队伍的分数:
1
2
3
4
5
6
7
8
use std::collections::HashMap;

fn main() {
    let mut scores = HashMap::new();

    scores.insert(String::from("Blue"), 10);
    scores.insert(String::from("Yellow"), 50);
}
利用 vector 的 zip 方法在初始化时创建 HashMap:
1
2
3
4
5
6
7
use std::collections::HashMap;

fn main() {
    let teams = vec![String::from("Blue"), String::from("Yellow")];
    let initial_scores = vec![10, 50];
    let scores: HashMap<_, _> = teams.iter().zip(initial_scores.iter()).collect();
}
Hash Map 会对其中的值有 ownership。下面的例子中,在执行了 map.insert 以后,field_name 和 field_value 失去对原先值的 ownership:
1
2
3
4
5
6
7
8
9
use std::collections::HashMap;

fn main() {
    let field_name = String::from("Favorite color");
    let field_value = String::from("Blue");

    let mut map = HashMap::new();
    map.insert(field_name, field_value); // 之后 field_name 和 field_value 失去对原先值的 ownership
}
拿到 HaspMap 中的值:
1
2
3
4
5
6
#![allow(unused)]

fn main() {
    let team_name = String::from("Blue");
    let score = scores.get(&team_name);
}
这里的 score 是一个 Some(&10),也就是说,是一个 Option<&V>;如果值不存在,返回 None。
遍历 HashMap:
1
2
3
4
5
fn main() {
    for (key, value) in &scores {
        println!("{}: {}", key, value);
    }
}
利用 entry 方法和 or_insert 来实现只有当 key 不存在时才 insert 新值:
1
2
3
fn main() {
    scores.entry(String::from("Blue")).or_insert(50);
}
String
String 特性
- UTF-8 编码
- growable
- mutable
新建 String
1
2
3
4
5
6
7
#![allow(unused)]

fn main() {
    let mut s = String::new(); // 新建
    let s = "initial contents".to_string(); // 带初始值的新建
    let s = String::from("initial contents"); // 和上面等价
}
- push_str 和 push
1
2
3
4
5
6
7
8
9
#![allow(unused)]

fn main() {
    let mut s1 = String::from("foo");
    let s2 = "bar";
    s1.push_str(s2); // push_str 把一个 string slice 加在后面。push_str 不需要 s2 的 ownership

    s.push('l'); // push 用来添加单个字符在后面
}
- 用 + 号连结
1
2
3
4
5
6
7
8
9
#![allow(unused)]

fn main() {
    let s1 = String::from("Hello, ");
    let s2 = String::from("world!");

    // s1 会被 move,失去「所有权」
    let s3 = s1 + &s2; // Note s1 has been moved here and can no longer be used
}
- 复杂的字符串拼接用 format!
1
2
3
4
5
6
7
8
9
#![allow(unused)]

fn main() {
    let s1 = String::from("tic");
    let s2 = String::from("tac");
    let s3 = String::from("toe");

    let s = format!("{}-{}-{}", s1, s2, s3);
}
- 支持 == 和 !=
- 字符串内容(存储在内存中的字符串内容)是否相等的比较
- 例如:”th\u{e9}” 和 “the\u{301}” 是不相等的,尽管它们显示出来都是法文的 thé,但它们内存中的字符串内容不同
- 字符串内容(存储在内存中的字符串内容)是否相等的比较
- Rust 保证 String 中的字符必须是有效的 UTF-8 编码的字符
- 当真的要处理无效的 UTF-8 编码的时候,需要使用其他的类型(&Path,OsString 等等),而不能使用 String 类型
string slice
- slice 允许你引用 collection 中一段连续的元素序列,而不用引用整个 collection
- 除了「引用」之外,slice 也不拥有数据的 ownership
例如,引用一个整数数组中的一部分:
1
2
3
4
5
6
7
#![allow(unused)]

fn main() {
    let a = [1, 2, 3, 4, 5];

    let slice = &a[1..3];
}
注意:在编译期间不知道 String 类型的 size;而 &str 的 size 在编译期间已知
- Rust 专门有一个 string slice(&str)类型来表达 string literals:a reference to part of a String
举个例子:
需要写一个函数获取字符串的第一个单词。函数入参可以是一个对 String 类型的引用(&String)。但返回值是什么呢?
这里返回值可以使用 string slice(&str):
1
2
3
4
5
6
7
8
9
10
11
fn first_word(s: &String) -> &str {
    let bytes = s.as_bytes(); // 把 String 转换为 byte 数组

    for (i, &item) in bytes.iter().enumerate() {
        if item == b' ' {
            return &s[0..i];
        }
    }

    &s[..]
}
- 但在处理字符串时,尽量不要牵涉到 byte 操作,而是要尽量用字符相关的操作
- 因为 Rust 中的字符是 UTF-8 编码,一个 UTF-8 编码的字符有几个 bytes 是不确定的。而且也是因为这个「不确定」,要获取 String 的某个 UTF-8 字符,只能是遍历整个 String:
利用 chars 来遍历字段串的例子:
1
2
3
4
5
6
7
#![allow(unused)]

fn main() {
    for c in "您好".chars() {
        println!("{}", c);
    }
}
- String 上的 slice range 语法是 byte 级别的操作。如果尝试从一个多字节字符的中间位置创建字符串 slice,则程序将会因错误而退出。
1
2
3
4
5
6
7
8
9
#![allow(unused)]

fn main() {
    let s = String::from("hello world");

    // 该例子是 ASCII 字符集上的 String,所以不会出错
    let hello = &s[0..5];
    let world = &s[6..11];
}
其他一些关于 &str 的要点:
- “您好”.len() 返回的是 byte 数,而不是字符数。”您好”.chars().count() 才返回的是字符数
- &str 不能被修改;所以如果要在运行时修改一个字符串,需要使用 String
- 不过 make_ascii_uppercase 和 make_ascii_lowercase 这 2 个方法是例外,它们会修改 &mut str
- 从 String 中拿到对应的 &str。例如,要在一个 String 上进行 match 可以这样:
1
2
3
4
5
6
7
8
9
10
11
12
fn main() {
    let s = String::from("Canada");

    match s.as_str() {
        "Japan" => {
            println!("Match");
        }
        _ => {
            println!("Un-Match");
        }
    }
}
struct
Rust 中利用 struct 实现了一种把不同的数据聚合在一起的方法。这种方法主要使用在需要不同数据类型需要同时存在在一起的场景。
以此向对应的,如果需要把多种数据类型聚合在一起,但不需要它们同时出现,可以使用 enum 。
定义一个 struct ,然后定义一个返回 struct 的方法
1
2
3
4
5
6
7
8
9
10
11
12
13
14
15
16
17
18
19
20
21
#![allow(unused)]

fn main() {
    struct User {
        username: String,
        email: String,
        sign_in_count: u64,
        active: bool,
    }

    fn build_user(email: String, username: String) -> User {
        User {
            // 变量名和结构体字段名相同时,可以使用初始化简写
            email,
            // 变量名和结构体字段名相同时,可以使用初始化简写
            username,
            active: true,
            sign_in_count: 1,
        }
    }
}
结构体的上下文中可以定义方法(method):
- method 的第一个参数总是 self,它代表调用该方法的结构体实例
下面的例子给 Rectangle 这个结构体定义并实现了 area 和 can_hold(注意 impl 关键字的使用):
1
2
3
4
5
6
7
8
9
10
11
12
13
14
15
16
17
18
19
20
21
22
23
#[derive(Debug)]
struct Rectangle {
    width: u32,
    height: u32,
}

impl Rectangle {
    fn area(&self) -> u32 {
        self.width * self.height
    }

    fn can_hold(&self, other: &Rectangle) -> bool {
        self.width > other.width && self.height > other.height
    }
}

fn main() {
    let rect1 = Rectangle { width: 30, height: 50 };
    let rect2 = Rectangle { width: 10, height: 40 };

    println!("The area of the rectangle is {} square pixels.", rect1.area());
    println!("Can rect1 hold rect2? {}", rect1.can_hold(&rect2));
}
一般来说 method 的第一个参数可以是 &self 或者 &mut self
- tuple structs:tuple structs 的用法和普通 struct 类似,但 tuple structs 没有具体的字段名,只有字段的类型。简单点说,就是定义一个有类型名字的 tuple 类型。给个例子:
1
2
/// 定义一个颜色类型,其包含 3 个三元色的值
struct Color(i32, i32, i32);
- struct update。如下例子:
1
2
3
4
5
6
7
8
9
10
11
12
13
14
15
16
17
18
19
20
21
22
23
24
25
26
27
28
29
#![allow(unused)]

struct User {
    active: bool,
    // 注意:这里的 username 是 String 类型,一旦发生 move,整个 struct 也不能再被使用
    username: String,
    email: String,
    sign_in_count: u64,
}

fn main() {
    // 先定义 user1
    let user1 = User {
        email: String::from("someone@example.com"),
        username: String::from("someone123"),
        active: true,
        sign_in_count: 1,
    };

    // 然后通过更新的方式来定义 user2
    // 注意:这里发生了一次 String 类型 username 的 move,之后不能再使用 user1
    let user2 = User {
        active: user1.active,
        username: user1.username,
        // 实际上 user1 和 user2 只有 email 这 1 个字段不同
        email: String::from("another@example.com"),
        sign_in_count: user1.sign_in_count,
    };
}
- 上面的例子也可以采用简约写法:
1
2
3
4
5
6
7
8
9
10
11
12
13
14
15
16
17
18
19
20
21
22
23
24
25
#![allow(unused)]

struct User {
    active: bool,
    username: String,
    email: String,
    sign_in_count: u64,
}

fn main() {
    // 先定义 user1
    let user1 = User {
        email: String::from("someone@example.com"),
        username: String::from("someone123"),
        active: true,
        sign_in_count: 1,
    };

    // 注意:这里发生了一次 String 类型 username 的 move,之后不能再使用 user1
    let user2 = User {
        // 实际上 user1 和 user2 只有 email 这 1 个字段不同,采用了 ..user1 这种简约写法
        email: String::from("another@example.com"),
        ..user1
    };
}
注意:struct 的生命周期请参考:结构体的生命周期注解
type-associated functions
impl 的实现中,有时候不是针对单个 struct 实例的,而是针对整个类型,所以参数列表中没有 self 参数。
把参数中没有 self 的 methods 叫做 type-associated functions。例如:
1
2
3
4
5
impl Queue {
  pub fn new() -> Queue {
    Queue { older: Vec::new(), younger: Vec::new() }
  }
}
对应的使用方法如下:
1
2
let mut q = Queue::new();
q.push('*');
enum
Rust 的枚举(enum)中的「成员」可以存储各种类型。例如:
1
2
3
4
5
6
7
8
9
10
11
12
13
14
#![allow(unused)]

fn main() {
    enum Message {
        // 普通「枚举成员」,没有嵌入任何其他类型
        Quit,
        // 存储了一个匿名 struct 的「枚举成员」
        Move { x: i32, y: i32 },
        // 存储一个 String 类型的「枚举成员」
        Write(String),
        // 存储了 3 个 i32 的「枚举成员」
        ChangeColor(i32, i32, i32),
    }
}
Rust 还可以在枚举上定义方法(类似 struct)。例如针对上面定义的 Message 枚举类型定义了一个 call 方法:
1
2
3
4
5
6
7
8
9
10
11
12
13
14
15
16
17
18
19
#![allow(unused)]

fn main() {
    enum Message {
        Quit,
        Move { x: i32, y: i32 },
        Write(String),
        ChangeColor(i32, i32, i32),
    }

    impl Message {
        fn call(&self) {
            // 在这里定义方法体
        }
    }

    let m = Message::Write(String::from("hello"));
    m.call();
}
标准库中的 Option 就是一个枚举类型,其定义如下:
1
2
3
4
enum Option<T> {
    Some(T),
    None,
}
Patterns
再重点介绍一下 Patterns。
首先明确一点:相对于 Expressions 产生 values;Patterns 消费 values。
Patterns 的作用对象可以是:enum,struct 或 tuple。
Patterns 内部有 identifiers 的话,这些 identifiers 会成为局部变量。这些 identifiers 的 values 会被 copy 或 move 到这些局部变量。
用一个例子来说明 move:
1
2
3
4
5
6
match account {
    Account {name, language, ..} => {
        ui.greet( & name, & language);
        ui.show_setting( & account); // error: borrow of moved value: `account`
    }
}
上面的例子中,account.name 和 account.language 已经被 move 到 2 个局部变量中,account 然后就被 drop 掉了。所以,之后不能再 borrow account。
除了 copy 和 move,也可以使用 ref 关键字,表示 borrow(不对 value 进行消费,只是 borrow)。例如:
1
2
3
4
5
6
match account {
    Account { ref name, ref language, .. } => {
        ui.greet(name, language); // 只 borrow,不消费
        ui.show_setting( & account); // ok
    }
}
最后,看一个 Patterns 的应用 while let 表达式:
1
2
3
4
5
6
7
8
9
10
11
fn main()
{
    //gfg is a variable
    let mut gfg = "Printing Geeks for Geeks using while let".chars();
    // let pattern = expr(如果表达式能和这个 pattern 匹配,执行循环)
    while let Some(x) = gfg.next() {
        //print is a statement that is used to print characters in one line
        print!("{}", x);
    }
    println!("\n");
}
match
- match 关键字后跟一个表达式
- 执行时,根据这个表达式计算出来的值,按顺序进行匹配,进入匹配成功的分支
- match 的每个分支由 2 部分组成
- 模式:用来匹配是否进入该分支
- 代码:进入该分支后需要执行的代码;
- 而且每个分支的执行代码有一个结果值,被匹配到的分支的结果值就是整个 match 表达式的值
枚举的成员是 struct 的例子:
1
2
3
4
5
6
7
8
9
10
11
12
13
14
15
16
17
18
19
20
21
22
23
#![allow(unused)]

pub enum Protection {
    // 枚举成员是一个匿名的 struct
    Secure { version: u64 },
    Insecure,
}

fn process(prot: Protection) {
    match prot {
        // 匹配的时候,匿名 struct 的值:{version}
        Protection::Secure { version } => {
            println!("Hacker-safe thanks to protocol v{}", version);
        }
        Protection::Insecure => {
            println!("Come on in");
        }
    }
}

fn main() {
    process(Protection::Secure { version: 2 })
}
问题:如果 match 的表达式是一个「引用」,那么 match 匹配的值是否也是「引用」?看一个例子:
1
2
3
4
5
6
7
8
9
10
11
12
13
14
15
16
17
18
19
20
21
22
23
24
25
26
#![allow(unused)]

pub enum Protection {
    // 枚举成员存储了一个 SecureVersion 类型的值
    Secure(SecureVersion),
    Insecure,
}

#[derive(Debug)]
pub enum SecureVersion {
    V1,
    V2,
    V2_1,
}

fn process(prot: &Protection) {
    match prot {
        // 答案:这里的 version 是一个引用:&SecureVersion
        Protection::Secure(version) => {
            println!("Hacker-safe thanks to protocol {version:?}");
        }
        Protection::Insecure => {
            println!("Come on in");
        }
    }
}
module
基本概念:
- Module:对代码进行组织的单元(逻辑上把对代码分成不同的部分,便于管理)
- Crate:独立的可编译单元,可以编译为「库」,或者是「可执行文件」
- Package:类似项目(或者工程)的概念,一个 Package 只能包含一个 Cargo.toml 文件
- 一个 Package 只能包含一个「库」;但一个 Package 可以包含多个「可执行文件」
- 这里的「库」和「可执行文件」就是上面提到的 Crate:独立的可编译单元
- 一个 Package 只能包含一个「库」;但一个 Package 可以包含多个「可执行文件」
下面给一个典型的 Package(项目)的目录结构:
1
2
3
4
5
6
7
8
9
10
11
12
13
14
15
.
├── Cargo.toml
├── Cargo.lock
├── src
│   ├── main.rs
│   ├── lib.rs
│   └── bin
│       └── main1.rs
│       └── main2.rs
├── tests
│   └── some_integration_tests.rs
├── benches
│   └── simple_bench.rs
└── examples
    └── simple_example.rs
几个关键词的作用:
- mod
- pub
- super
- use
另外就是下面 3 个 cargo 命令的用法:
- cargo new comm –lib
- cargo fmt
- cargo test
- cargo doc –no-deps –open
- 不生成依赖的文档
Attribute
- 在 Rust 中,Attributes 类似 Java 的注解(annotations),或者 C/C++ 中的 #ifndef 这种给编译器使用的属性
- Attributes 都是给编译器使用的
- 注解在 Rust 的各种 items 上
- 例如:注解在 module 上,并对整个 module 生效(标注在 module 上:#[cfg],#[allow])
- Rust 中 item 的类型具体有:
- module
- extern crate 声明
- use 声明
- 函数定义
- 类型定义
- 结构体定义
- 枚举定义
- 联合体定义
- 常量项
- 静态项
- trait 定义
- 实现
- 外部块
- crate 上:标注在整个 crate 的最前面,需要使用 #![cfg] (多一个 ! 表示作用在整个 crate 上)
- Rust 中常用的 Attributes 有 4 大类:
- Built-in attributes(内建属性):下面会有些例子
- Macro attributes(宏属性):略
- Derive macro helper attributes(派生宏辅助属性)
- Tool attributes(工具属性):略
一些常用的 Attributes:
- #[allow]:显示的关闭编译 warning。例如:#[allow(non_camel_case_types)]
- #[cfg]:用于设置编译选项,具体配置项可参考说明。例如:#[cfg(test)](用于标注只在测试时生效的代码)
- #[test]:测试相关
- #[doc]:自动生成代码文档
- #[derive]:derive 属性会在使用 derive 语法标记的类型上生成对应 trait 的默认实现的代码。给 2 个例子:
- #[derive(Debug)]:只要给 struct 和 enum 加上这个 derive 属性,就可以在 println! 里面直接使用 {:?} 或者 {:#?}
- #[derive(Copy, Clone)]:Copy 和 Clone
error
- 开发人员作为不同身份时,可以利用不同的方式来应对异常
- 作为库的开发人员
- 定义这个库的专用异常类型,通过这个专用异常类型告诉库的使用者,当遇到不同的异常时,需要进行相应的处理
- 举个例子,一个用于查询 MySQL 的库;当执行 SQL 语句失败时,需要告诉库的使用者失败原因;而库的使用者根据失败原因做不同的动作:可重试的进行重试,不可重试的直接通知最终用户本次请求失败等等
- 而且大多数场景,库本身可以不直接打印日志(而是由库的使用者来决定库相关日志的配置,例如日志级别,日志文件位置)
- 定义这个库的专用异常类型,通过这个专用异常类型告诉库的使用者,当遇到不同的异常时,需要进行相应的处理
- 作为应用(在线服务)的开发人员
- 不可恢复异常;对一个在线服务,开发人员可以考虑把「不可恢复异常」透传到最外层,在最外层完成下列工作:
- 记录上下文(统计,排查,报警等目的)
- 结束当前请求
- 同时返回给最终用户一个友好的提示
- 可恢复异常:这里的「可恢复异常」可以理解为程序正常执行的多种可能的分支中的一个逻辑分支
- 开发人员的工作:把代码流程转入对应的逻辑分支(如有必要可打印日志,例如用于统计)
- 不可恢复异常;对一个在线服务,开发人员可以考虑把「不可恢复异常」透传到最外层,在最外层完成下列工作:
- 作为库的开发人员
要达到以上目标,一种程序设计语言中,需要提供以下功能:
- 函数调用除了返回正常结果,也可以抛出异常
- 异常需要带必要的信息:异常码,异常信息,异常时的上下文信息(调用堆栈,代码行号等)
- 尽可能提供模块级别(Module Level)的异常类,而不是全局(Crate Level)的异常类
- 相同的底层异常(例如一个 IO 异常)抛出时,最好能区分该异常抛出时的上下文信息
- 便捷的把异常透传到最外层
- 捕捉到异常后,便捷的根据异常具体的信息,执行不同的代码逻辑
- 通过日志门面库(类似 Java 的 slf4j)和日志实现库(类似 Java 的 log4j,logback)配合,来灵活的记录日志
而在 Rust 中,异常处理相关的语法有:
- panic!
- RESULT
panic
其实对在线服务来说,panic 其实不怎么用。使用 panic 的例子:
1
2
3
fn main() {
    panic!("crash and burn");
}
- 发生 panic 后,Rust 会 unwind stack 后继续执行。但有 2 个例外的情况 Rust 不会做 unwind:
- 当遇到一个 panic 后,Rust 在做 drop 时,又触发了一个新的 panic;此时会干掉整个进程!
- 编译时带上 -C panic=abort 选项,当遇到一个 panic 后,直接干掉整个进程!
- panic 是线程级别的。单个线程里面 panic 了,并不会影响其他线程的正常执行
- 也可以 catch 住 panic,这样线程可以继续执行(参考标准库的:std::panic::catch_unwind)
Result
Rust 使用一个标准库定义的 Enum 类型 Result 来表达函数的正常返回和异常:
1
2
3
4
enum Result<T, E> {
    Ok(T),
    Err(E),
}
用 enum 的潜台词就是函数返回时,要么返回一个正常的结果,要么遇到一个可恢复异常。
分别对正常结果,和异常处理的例子:
1
2
3
4
5
6
7
8
9
10
11
fn main() {
    match get_weather(hometown) {
        Ok(report) => {
            display_weather(hometown, &report);
        }
        Err(err) => {
            println!("error querying the weather: {}", err);
            schedule_weather_retry();
        }
    }
}
异常类型忽略的写法:
1
2
3
4
#![allow(unused)]

// 返回一个 () 或遇到一个异常
fn remove_file(path: &Path) -> Result<()> {}
这种写法用来表示这个 Module 中定义了 Result 类型的 type alias,省得到处都要写异常的具体类型(一般来说,某个 Module 中的异常都是相同类型的异常):
1
pub type Result<T> = result::Result<T, io::Error>;
Result 配合 unwrap 的使用:
1
2
3
4
5
6
7
8
9
10
11
12
13
#![allow(unused)]

use std::fs::File;

fn main() {
    // unwrap():成功的话,从 Result<T> 中拿到 T,失败的话,panic
    // 不推荐使用,因为一般来说,不应该使用 panic
    let f = File::open("hello.txt").unwrap();

    // 一般推荐的做法有 2 种:
    // 1) 使用 unwrap_or_else:成功拿到 T;失败的话,通过执行一个 closure 得到 T
    // 2) 或者把异常传递到调用者
}
Result 配合 expect 的使用:
1
2
3
4
5
6
7
#![allow(unused)]

use std::fs::File;

fn main() {
    let f = File::open("hello.txt").expect("Failed to open hello.txt");
}
一个把异常传递到调用者的例子:
1
2
3
4
5
6
7
8
9
10
11
12
13
14
15
16
17
18
19
use std::io;
use std::io::Read;
use std::fs::File;

fn read_username_from_file() -> Result<String, io::Error> {
    let f = File::open("hello.txt");

    let mut f = match f {
        Ok(file) => file,
        Err(e) => return Err(e), // 第一个可能传递异常的位置
    };

    let mut s = String::new();

    match f.read_to_string(&mut s) {
        Ok(_) => Ok(s),
        Err(e) => Err(e), // 第二个可能传递异常的位置
    }
}
上面的例子,可以利用 ? 进行简化(功能完全相同,但代码更整洁)
1
2
3
4
5
6
7
8
9
10
use std::io;
use std::io::Read;
use std::fs::File;

fn read_username_from_file() -> Result<String, io::Error> {
    let mut f = File::open("hello.txt")?;
    let mut s = String::new();
    f.read_to_string(&mut s)?;
    Ok(s)
}
还可以利用链式写法进一步简化:
1
2
3
4
5
6
7
8
9
10
11
use std::io;
use std::io::Read;
use std::fs::File;

fn read_username_from_file() -> Result<String, io::Error> {
    let mut s = String::new();

    File::open("hello.txt")?.read_to_string(&mut s)?;

    Ok(s)
}
注意: 一个方法如果不返回 Result 类型,就不能使用 ? 来进行简化。
实现 Error Trait
在很多场景里面,使用 Rust 时,目前最好的实践还是自己实现一个 Error 类型(枚举或结构),也就是实现标准库里面的 Error Trait:
1
2
3
4
5
6
7
8
9
pub trait Error: Debug + Display {
    /// The lower-level source of this error, if any.
    /// dyn Error 是一个 trait object
    /// trait object 作为 Rust 中的多态,这样既可以无需关注异常的具体类型,也可以通过 source 获取异常时具体的调用链
    /// 如果该错误类型中包含了底层的错误 Err,那么 source 方法应该返回 Some(err), 如果没有返回 None。不重写则默认为 None
    fn source(&self) -> Option<&(dyn Error + 'static)> {
        None
    }
}
一个实现了 source,并利用 source 打印异常堆栈的例子:
1
2
3
4
5
6
7
8
9
10
11
12
13
14
15
16
17
18
19
20
21
22
23
24
25
26
27
28
// A new error type, wrapping a sqlx::Error
pub struct StoreTokenError(sqlx::Error);

impl std::error::Error for StoreTokenError {
    fn source(&self) -> Option<&(dyn std::error::Error + 'static)> {
        // The compiler transparently casts `&sqlx::Error` into a `&dyn Error`
        Some(&self.0)
    }
}

fn error_chain_fmt(
    e: &impl std::error::Error,
    f: &mut std::fmt::Formatter<'_>,
) -> std::fmt::Result {
    writeln!(f, "{}\n", e)?;
    let mut current = e.source();
    while let Some(cause) = current {
        writeln!(f, "Caused by:\n\t{}", cause)?;
        current = cause.source();
    }
    Ok(())
}

impl std::fmt::Debug for StoreTokenError {
    fn fmt(&self, f: &mut std::fmt::Formatter<'_>) -> std::fmt::Result {
        error_chain_fmt(self, f)
    }
}
另外的惯用法是,在一个 Module 中定义一个枚举错误类型来封装多种异常类型:
1
2
3
4
5
6
7
#[derive(Debug)]
pub enum SubscribeError {
    ValidationError(String),
    DatabaseError(sqlx::Error),
    StoreTokenError(StoreTokenError),
    SendEmailError(reqwest::Error),
}
然后用 From 来把其他错误类型转换为这个 Module 专用的错误类型。例如:
1
2
3
4
5
impl From<sqlx::Error> for SubscribeError {
    fn from(e: sqlx::Error) -> Self {
        Self::DatabaseError(e)
    }
}
尽管通过以上代码可以实现一个 Error Trait,但还是太繁琐了。现在流行的做法是用库来自动生成 Error 类型,例如:
- thiserror
- snafu
具体用法可以参考这些库的文档。
日志
- Rust 比较流行的「日志门面库」是:log 库(类似 Java 的 slf4j)
1
use log::*;
- 真正输出日志,除了「日志门面库」之外,还需要「日志库」。这里重点介绍一下 tracing 库
- 由于很多场景,记录日志时,需要区分不同的「执行流」,并能在日志中查看属于某个「执行流」的所有日志。tracing 库引入了 span 概念
- 例如:在服务端,按某一次用户请求来记录日志,然后可以在服务端日志里面查看这次请求的执行流程。那么服务端对这次请求处理的开始到结束就是一个 span
- 也就是说,可以利用 tracing 库来跟踪「逻辑上下文」
- tracing 使用「结构化数据」来记录「逻辑上下文」的信息(一般来说就是 kv 对)。然后在最后输出的每条日志中,同时输出这个 kv 对的值。例如如下输出(每条日志都输出了每次请求的 client.addr 的值,用来标明每条日志的「逻辑上下文」):
1
2
3
4
5
6
7
8
DEBUG server{client.addr=106.42.126.8:56975}: accepted connection
DEBUG server{client.addr=82.5.70.2:53121}: closing connection
DEBUG server{client.addr=89.56.1.12:55601} request{path="/posts/tracing" method=GET}: received request
DEBUG server{client.addr=111.103.8.9:49123}: accepted connection
DEBUG server{client.addr=106.42.126.8:56975} request{path="/" method=PUT}: received request
DEBUG server{client.addr=113.12.37.105:51342}: accepted connection
 WARN server{client.addr=106.42.126.8:56975} request{path="/" method=PUT}: invalid request headers
TRACE server{client.addr=106.42.126.8:56975} request{path="/" method=PUT}: closing connection
最后给一个异步代码使用 tracing 的例子:
1
2
3
4
5
6
7
8
9
10
11
12
13
14
15
16
17
18
19
20
21
#![allow(unused)]

fn main() {
// 对每个用户请求 spawn 一个异步任务
    tokio::spawn(async move {
        let fd = socket.as_raw_fd();

        if let Err(err) = process(socket, fd, &mut cli).await {
            error!("this client has an error, disconnect it {}!", err);
        }
    });

    // 然后利用 tracing 的 instrument 宏,指明用于「逻辑上下文」的数据为 fd
    #[instrument(skip(socket, cli))]
    pub async fn process(socket: TcpStream, fd: i32, cli: &mut reqwest::Client) -> Result<()> {
        // 最后日志输出的时候,都会带上 fd 的值作为
        info!("the server accepted a new client. fd is: {}", fd);
        // 例如这个日志输出:
        // 2022-04-26T08:00:28.904581Z  INFO process{fd=10}: rmr: the server accepted a new client. fd is: 10
    }
}
traits
- 在 Rust 中,Trait 就类似 Java 的 Interface(接口)的作用
- 使用 trait 时必须先 use 它。但 Clone 和 Iterator 是例外,可以不导入也能用,这是因为 Clone 和 Iterator 在 standard prelude 中
standard prelude(标准前置模块):Rust 会把「标准前置模块」自动导入到所有 module 中;所有可以直接用,无需导入
- trait 作为函数参数的例子(注意 impl 关键字的使用):
1
2
3
4
// item 可以是实现了 Summary trait 的类型
pub fn notify(item: impl Summary) {
    println!("Breaking news! {}", item.summarize());
}
- 给一个和上面 impl 等价的使用了泛型参数声明的写法:
1
2
3
pub fn notify<T: Summary>(item: T) {
    println!("Breaking news! {}", item.summarize());
}
- 指定多个 trait bound 的例子:
1
2
3
#![allow(unused)]

pub fn notify<T: Summary + Display>(item: T) {}
等价:
1
2
3
#![allow(unused)]

pub fn notify(item: impl Summary + Display) {}
- 通过 where 简化的例子:
1
2
3
4
5
6
#![allow(unused)]

fn some_function<T, U>(t: T, u: U)
    where T: Display + Clone,
          U: Clone + Debug
{}
- Rust 中可以使用 trait 来实现多态(polymorphism)的效果。利用 trait 来达到多态的效果有 2 种方法:
- Trait Objects:A reference to a trait type is called a trait object
- 翻译:trait object 就是对一个 trait 类型的引用
- trait object 是 fat pointer,由 2 部分组成:
- 指向 value 的指针
- 执行 value 的类型的指针
- Generic Type Parameter:使用泛型作为函数类型参数
- Trait Objects:A reference to a trait type is called a trait object
给一个 trait object 的例子:
1
2
3
4
5
6
7
8
9
10
#![allow(unused)]

fn main() {
    let mut local_file = File::create("hello.txt")?;

    // 函数入参 &mut local_file 是一个 &mut File 类型的引用
    // 而 say_hello 的入参定义是一个 trait object:&mut dyn Write
    // 这里隐含了一个 Rust 的自动转换:&mut File => &mut dyn Write
    say_hello(&mut local_file)?;
}
给一个泛型作为函数类型参数的例子:
1
2
3
4
5
6
7
#![allow(unused)]

use std::hash::Hash;
use std::fmt::Debug;

// 这里的类型 T 必须同时是 3 个 traits 的实现:Debug,Hash,Eq
fn top_ten<T: Debug + Hash + Eq>(values: &Vec<T>) {}
- 利用 trait 来达到多态的效果的 2 种方法的对比:
- Trait Object:
- 如果一个集合中需要包含多种不同类型的元素,那么要用 trait object
- 另外,使用 trait object 可以节约编译时间(因为 trait object 是在运行时才确认指向的具体对象);就是所谓的「dynamic dispatch」(dyn 关键字)
- Generic Type Parameter:
- 泛型类型参数的运行效率更高(泛型是在编译时展开,所以运行时无额外的代价)
- Trait Object:
其他一些 trait 相关的注意事项:
- 可以给 trait 提供一个 default 实现
- Rust 允许在任何类型实现任何 trait;也就是说,我们甚至可以在基础类型(举例: char 类型)上实现新的 trait
- 也可以在某个泛型类型上实现 trait。给个例子:
1
2
3
4
5
6
7
#![allow(unused)]

// 在 Write 这个泛型类型上实现一个 WriteHtml trait
impl<W: Write> WriteHtml for W {
    fn write_html(&mut self, html: &HtmlDocument) -> io::Result<()>
    {}
}
- orphan rule:can’t implement external traits on external types
- 不能给对外部类型实现外部 traits;这样 Rust 才能确保当前的这个 trait 的实现是「唯一」的(在一个 crate 内,一个 trait 不能同时有 2 个实现)
- 举个例子:在我们自己的 crate 里面不能对
Vec<T>实现 Display trait(标准库里面已经在Vec<T>上实现了 Display trait)
下面的小节会介绍一些常用 Traits
Drop
- 当一个 value 的 owner 失效后,Rust 会 Drop 这个 value。具体成来说可能有几种场景:
- 变量的 scope 结束
- vector 中的一个元素被删除
- 通常来说,Rust 已经提供了 Drop Trait 的实现(例如 vector/标准库中的文件相关)
- 但我们也可以自己重新实现 Drop Trait。但一旦实现了 Drop Trait,就不能再实现 Copy Trait
- 另外一个值得注意的是,Drop 只会被调用一次(move 的时候其实不会调用 Drop,只有 value 真正失效时,才会调用 Drop)
Sized
- A sized type is one whose values all have the same size in memory
- 翻译:该类型中所有的 values 的 size 必须是相同
- 实现了 std::marker::Sized 这个 trait。Rust 已经都实现了,开发者不能再提供自己的实现
- 所以唯一的用途就是作为类型的 bound,比如使用泛型时的 bound
- enum 也是 sized 类型:尽管 enum 中各个变量的类型可能不同,但 Rust 会按最大所需的 size 给每个变量分配空间
尽管 Rust 中绝大多数类型是 Sized 的,但有几种类型不是 Sized:
- slice type str (note, without an &) is unsized
- Array slice types like [T] (again, without an &)
- dyn type:the referent of a trait object
unsized 类型不能作为函数参数,也不能直接用一个变量来 store 这个类型的值。只能通过引用或者指针来操作 unsized 类型的值
Clone
Clone trait 定义如下:
1
2
3
4
5
6
trait Clone: Sized {
    fn clone(&self) -> Self;
    fn clone_from(&mut self, source: &Self) {
        *self = source.clone()
    }
}
- Clone 必然是工作在 Sized 类型上(该类型的大小可确定)
- 大多数时候,clone_from (clone 出来源的值,并替换掉 self)使用默认实现就行了:直接用 clone 来实现
Copy
Rust 中,赋值时,默认的行为时 move。但可以通过实现 Copy trait (std::marker::Copy)来替换默认行为。Copy trait 定义如下:
1
trait Copy: Clone {}
- 限制:实现了 Drop trait 的类型不能被 Copy
- #[derive(Copy, Clone)] 的使用
Deref and DerefMut
Deref 和 DerefMut 主要的用途有 2 个:
- 给自定义的类型提供类似 Rust「原生」的「解引用」操作
- deref coercions,也就是可以实现「自动的」把一个类型的「引用」转换」成另外一个类型的「引用」
先看「解引用」,回顾一下 Rust 中的「解引用」操作符号 * 的用法:
1
2
3
4
5
6
7
8
fn main() {
    let x = 5;
    // & 引用就是 Rust 中的安全指针
    let y = &x;

    assert_eq!(5, x);
    assert_eq!(5, *y);
}
通过实现 std::ops::Deref 和 std::ops::DerefMut 这 2 个 trait 来实现「自定义」类型的 * 「解引用」操作符号。例如 Box<T> 实现了 Deref 和 DerefMut,就可以如下使用:
1
2
3
4
5
6
7
8
fn main() {
    let x = 5;
    // Box<T> 就是 Rust 中的智能指针
    let y = Box::new(x);

    assert_eq!(5, x);
    assert_eq!(5, *y);
}
Deref 和 DerefMut 这 2 个 trait 大概定义如下:
1
2
3
4
5
6
7
8
9
10
trait Deref {
    type Target: ?Sized;
    // 注意:这里返回的是一个「引用」
    fn deref(&self) -> &Self::Target;
}

trait DerefMut: Deref {
    // 注意:这里返回的是一个「引用」
    fn deref_mut(&mut self) -> &mut Self::Target;
}
- 其中,通过 self 可以拿到(own 这个值,或者有这个值的「引用」)类型为 Target 的值,而且 deref 会返回这个值的「引用」,同时 2 者生命周期保持一致
- 而且,DerefMut 需要实现 Deref
给一个 Box 的对 Deref 实现的例子:
1
2
3
4
5
6
7
8
9
10
11
12
13
14
15
16
17
18
19
20
21
22
23
24
25
26
use std::ops::Deref;

struct MyBox<T>(T);

impl<T> MyBox<T> {
    fn new(x: T) -> MyBox<T> {
        MyBox(x)
    }
}

impl<T> Deref for MyBox<T> {
    type Target = T;

    // 注意,这里返回的是 Target 的引用
    fn deref(&self) -> &Self::Target {
        &self.0
    }
}

fn main() {
    let x = 5;
    let y: MyBox<i32> = MyBox::new(x);

    assert_eq!(5, x);
    assert_eq!(5, *y);
}
再看一下 deref coercions。
deref coercions:one type is being “coerced” into behaving as another。也就是自动把一个类型的「引用」转换为另外一个类型的「引用」。
简单点说,如果实现了 Defer(入参是 &self,返回是 &Self::Target),就有了自动 &U 转换为 &T 的效果。如果 Rust 发现当前使用 &U 会编译失败,需要 &T 才能编译通过;同时又发现该类型 U 提供的 Deref 实现了 &U 到 &T,Rust 就会自动做这种转换。例如:
Rc<T>实现了Deref<Target=T>。对Rc<String>,如果要调用String::find方法,r.find('?')可以通过编译(等价于(*r).find('?'))- Rust 自动做了转换:&Rc -> &String
String实现了Deref<Target=str>。所以可以 coerce 一个&String的值到&strVec<T>实现了 Deref<Target=[T]>。所以可以把 bytes vector 传给一个入参是 slice &[u8] 的函数
最后还是给一个 MyBox 的例子:
1
2
3
4
5
6
7
8
9
10
11
12
13
14
15
16
17
18
19
20
21
22
23
24
25
26
27
28
29
30
31
32
33
34
35
use std::ops::Deref;

struct MyBox<T>(T);

impl<T> MyBox<T> {
    fn new(x: T) -> MyBox<T> {
        MyBox(x)
    }
}

impl<T> Deref for MyBox<T> {
    type Target = T;

    // 注意,这里返回的是 Target 的引用
    fn deref(&self) -> &Self::Target {
        &self.0
    }
}

fn main() {
    let x = 5;
    let y: MyBox<i32> = MyBox::new(x);

    assert_eq!(5, x);
    assert_eq!(5, *y);

    let m = MyBox::new(String::from("hello it"));

    // &MyBox<String> -> &String -> &str
    hello(&m);
}

fn hello(name: &str) {
    println!("OK, {}!", name);
}
Default
实现了 Default(std::default::Default)这个 trait,可以通过实现这个 trait 来给类型设置默认值。trait 定义如下:
1
2
3
trait Default {
    fn default() -> Self;
}
给个例子:
1
2
3
4
5
impl Default for String {
    fn default() -> String {
        String::new()
    }
}
AsRef and AsMut
这 2 个 traits 定义如下:
1
2
3
4
5
6
7
trait AsRef<T: ?Sized> {
    fn as_ref(&self) -> &T;
}

trait AsMut<T: ?Sized> {
    fn as_mut(&mut self) -> &mut T;
}
当需要借用(borrow)一个 &T 的时候,可以直接传入实现了这 2 个 traits 的类型的值。给个例子:
1
2
3
4
#![allow(unused)]

// 该函数的本义是需要一个 &Path(借用 Path 的值)类型的入参
fn open(path: &Path) -> Result<File> {}
但事实上,为了方便,该函数的声明可以是下面这个样子:
1
2
3
4
#![allow(unused)]

// 入参是一个 AsRef<Path>,这样所有实现了 AsRef<Path> 的类型的值都可以传入这个函数(例如:String 和 str)
fn open<P: AsRef<Path>>(path: P) -> Result<File> {}
这种机制提供了引用间的类型转换,有点类似 C++ 中的函数参数的重载(overload):
- 如果类型 U 实现了
AsRef<T>,则 as_ref 可以实现 &U 到 &T 的转换 - 如果类型 U 实现了
AsMut<T>,则 as_ref 可以实现从 &U 到 &mut T 的转换
给个例子:
1
2
3
4
5
6
7
8
9
10
11
12
13
14
15
16
17
18
19
20
21
22
23
24
25
26
27
28
29
30
31
32
33
34
35
36
37
38
39
40
41
42
fn print_ref(v: impl AsRef<str>) {
    println!("{}", v.as_ref());
}

#[allow(dead_code)]
enum Msg {
    Hello,
    World,
}

impl AsRef<str> for Msg {
    fn as_ref(&self) -> &str {
        match self {
            Msg::Hello => "hello",
            Msg::World => "world",
        }
    }
}

fn main() {
    // s1 是 &str 类型, str 类型实现了 AsRef<str>,&str 也实现了 AsRef<str>
    let s1 = "hello";
    // s2 是 String 类型, 实现了 AsRef<str>, &String 也实现了 AsRef<str>
    let s2 = String::from("word");
    // msg 是 Msg 类型, 实现了 AsRef<str>, &Msg 也实现了 AsRef<str>
    let msg = Msg::Hello;

    // str 类型实现了 AsRef<str>
    print_ref(s1); // hello
    // &str 类型实现了 AsRef<str>
    print_ref(&s1); // hello

    // &String 实现了 AsRef<str>
    print_ref(&s2); // world
    // String 实现了 AsRef<str>
    print_ref(s2); // world

    // &Msg 实现了 AsRef<str>
    print_ref(&msg); // hello
    // Msg 实现了 AsRef<str>
    print_ref(msg); // hello
}
Borrow and BorrowMut
Borrow 的定义:
1
2
3
trait Borrow<Borrowed: ?Sized> {
    fn borrow(&self) -> &Borrowed;
}
从其定义上看,Borrow 和 AsRef 非常类似。用一个例子说明 2 者的区别:
- String 实现了
AsRef<str>,AsRef<[u8]>,和AsRef<Path>,但这 3 个类型(str,u8,Path) 的 hash 值各不相同,不能保持一致。其中只有 &str slice 的 hash 值能和原类型 String 的 hash 值保持一致,所以 String 类型只会实现Borrow<str>。
Borrow trait 主要用于 hash 表,或其他的集合类型里的 key 值的 hash 值计算。给个例子:
1
2
3
4
5
6
7
#![allow(unused)]

impl<K, V> HashMap<K, V> where K: Eq + Hash {
    fn get(&self, key: &K) -> Option<&V> {
        // ...
    }
}
上面这个例子里面的实现是需要用一个 k 来获取 Map 的 v,但这里的 k 是 String 类型,传入了一个 &K。调用它的一个例子: hashtable.get( & “twenty-two”.to_string())
该调用的开销如下:
- 分配空间(”twenty-two”)
- 拷贝字符串(”twenty-two”.to_string())
- 执行 drop,销毁 String(调用结束)
为了更高效,可以改进为:入参是类型 Q,只要类型 Q 满足 Eq + Hash。同时,Map 中的 K 需要满足约束:实现了 Borrow<Q>:
1
2
3
4
5
6
7
8
9
10
11
#![allow(unused)]

impl HashMap<K, V> where K: Eq + Hash
{
    fn get<Q: ?Sized>(&self, key: &Q) -> Option<&V>
        where K: Borrow<Q>,
              Q: Eq + Hash
    {
        // ...
    }
}
简单点说,就是利用 Borrow 这个 trait 来对类型 K 进行约束。
From and Into
- 类型转换:把一个类型的值转换为另外一个类型的值
- 和 AsRef 不同,AsRef 进行的引用间的转换;而 From 和 Into 是值之间的转换
定义如下:
1
2
3
4
5
6
7
trait Into<T>: Sized {
    fn into(self) -> T;
}

trait From<T>: Sized {
    fn from(other: T) -> Self;
}
- 和 AsRef 差不多,Into 也有点像 overload(重载)
- From 常用来进行值的初始化
input output
Rust 的 IO 标准库重点就是 3 个 traits:
- Read:统称 Reader,具体的实现包括:Stdin,File,TcpStream
- BufRead:也是 Reader 的一种:就是 buffered Reader,继承了 Read trait;其内部有 buffer,这样读的效率会更高效。具体的实现包括:BufferReader,Cursor,StdinLock
- 如果需要在一个文件上重复读很多次,每次又只读少量数据,会比较低效;先读大块数据到 buffer 里面会更高效
- 比如 File 类型只实现了 Read,如果需要更高效的读文件,可以考虑使用实现了 BufRead 的 BufReader
- Write:统称 Writer,具体的实现包括:Stdout,Stderr,File。。。
Read
这里只重点介绍一些重点方法:
- reader.read(&mut buffer):把 byte 数据读到指定的 buffer 中(buffer 空间事先已经分配好了),然后返回实际读到的数据的长度。如果出错的话,就返回 io::Error
- reader.read_to_end(&mut byte_vec):把整个数据内容读到 byte_vec (
Vec<u8>)中
BufRead
BufRead 的重点方法:
- reader.read_line(&mut line):按 line 把数据读入到一个 String 类型中(结果包括行分割符:\n,\r\n)。返回本次读到的 byte 数
- reader.lines():返回一个 iterator,然后通过迭代拿到一个
io::Result<String>;同时 \n 不会被放到读到的 String 中
一个例子,利用 BufReader(实现了 BufRead)来读取文件:
1
2
3
4
5
6
7
8
9
10
11
12
13
14
15
16
17
use std::io::{self, BufReader};
use std::io::prelude::*;
use std::fs::File;

fn main() -> io::Result<()> {
    // File 没有 buffer
    let f = File::open("foo.txt")?;
    // 使用带 buffer 的 BufReader
    let f = BufReader::new(f);

    // BufReader 实现了 BufRead,可以利用 lines() 方法来读取文件,更加高效
    for line in f.lines() {
        println!("{}", line.unwrap());
    }

    Ok(())
}
Write
- 利用 write!() 和 writeln!() 这 2 个宏来使用 Write
- Write 的重点方法:
- write(&buf):把 byte 数据写出。成功的话,返回写入的大小;失败的话,返回 Error
- flush():把数据 flush 到写入目标
- Write 本身可以创建对应的 BufWriter。例如:BufWriter::new(writer);并且 BufWriter 也继承了 Write trait
- BufWriter 被 drop 的时候,会自动把被 buffer 的数据写出。但如果出现 Error,不保证能成功,所以有可能需要显示调用 flush
threads
首先明确一点:线程适合同时消耗多个 CPU 并行计算的场景;而不适合同时等待多个 IO 请求(磁盘或网络)的场景。
给一个最简单的例子:
1
2
3
4
5
6
7
8
9
10
11
12
use std::thread;

fn main() {
    let handle = thread::spawn(move || {
        // do stuff in a child thread
    });

    // do stuff in the main thread

    // block until child thread has exited
    handle.join.upwrap();
}
一个复杂的例子:
1
2
3
4
5
6
7
8
9
10
11
12
13
14
15
16
17
18
19
20
21
22
23
24
25
26
27
28
29
30
31
32
33
34
35
36
37
38
39
40
41
42
43
44
45
46
use log::{error, info};
use std::{thread, time::Duration};

fn sleep(seconds: f32) {
    thread::sleep(Duration::from_secs_f32(seconds));
}

pub mod dad {
    use super::{info, sleep};

    pub fn cook_spaghetti() -> bool {
        info!("Cooking the spaghetti...");
        sleep(4.0);
        info!("Spaghetti is ready!");
        true
    }
}

pub mod mom {
    use super::{info, sleep};

    pub fn cook_sauce_and_set_table() {
        sleep(1.0);
        info!("Cooking the sauce...");
        sleep(2.0);
        info!("Sauce is ready! Setting the table...");
        sleep(2.0);
        info!("Table is set!");
    }
}

fn main() {
    env_logger::init();
    // dad 在工作子线程进行工作
    let handle = thread::spawn(|| dad::cook_spaghetti());

    // mom 在主线程进行工作
    mom::cook_sauce_and_set_table();

    // 主线程和工作子线程的工作都完成后,整体完成
    if handle.join().unwrap_or(false) {
        info!("Spaghetti time! Yum!")
    } else {
        error!("Dad messed up the spaghetti. Order pizza instead?");
    }
}
Channels
Rust 线程间的通讯需要使用 channel。注意:
- 不推荐使用 std::sync::mpsc
- 推荐使用 crossbeam::channel(性能好,功能多;唯一的缺点可能只有不是标准库)
A channel is a one-way conduit for sending values from one thread to another(Rust 保证 channel 线程安全)
channel 又分为有界队列和无界队列 2 种:
- channel::bounded(8):队列长度为 8;如果队列长度大于 8,生产者(sender)会被阻塞;直到消费者(receiver)消费后才能解开
- channel::unbounded():无界队列;不会阻塞生成者,但发生突发负载时,系统可能爆
- 同一个 channel 可以有多个生产者和多个消费者
一个完整的例子:
1
2
3
4
5
6
7
8
9
10
11
12
13
14
15
16
17
18
19
20
21
22
23
24
25
26
27
28
29
30
31
32
33
34
35
36
37
38
39
40
41
42
43
44
45
46
47
48
49
50
51
52
53
54
55
56
57
58
59
60
61
62
63
64
65
66
67
68
69
70
71
use crossbeam::channel::{self, Receiver, Sender};
use std::{thread, time::Duration};

#[derive(Debug)]
enum Lunch {
    Soup,
    Salad,
    Sandwich,
    HotDog,
}

// 不断接受 orders 队列过来的任务,然后对不同类型的食物做一个对应的处理,最后处理好的食物送给 lunches 队列
fn cafeteria_worker(name: &str, orders: Receiver<&str>, lunches: Sender<Lunch>) {
    // 一旦 orders 队列所有的 senders 都被关闭,且队列中的数据被消费完,循环结束
    for order in orders {
        println!("{} receives an order for {}", name, order);
        let lunch = match &order {
            x if x.contains("soup") => Lunch::Soup,
            x if x.contains("salad") => Lunch::Salad,
            x if x.contains("sandwich") => Lunch::Sandwich,
            _ => Lunch::HotDog,
        };
        for _ in 0..order.len() {
            thread::sleep(Duration::from_secs_f32(0.1))
        }
        println!("{} sends a {:?}", name, lunch);
        // lunches 队列被关闭的话,整个循环结束
        if lunches.send(lunch).is_err() {
            break;
        }
    }
}

fn main() {
    // 新建 2 个 channels:orders 和 lunches

    let (orders_tx, orders_rx) = channel::unbounded();
    // orders 队列有 2 个 receivers
    let orders_rx2 = orders_rx.clone();
    let (lunches_tx, lunches_rx) = channel::unbounded();
    // lunches 队列有 2 个 senders
    let lunches_tx2 = lunches_tx.clone();

    // 创建 2 个工作子线程负责处理任务:
    // orders_rx 从 orders 里面接受任务,处理完成后再使用 lunches_tx 发送给  lunches
    // orders_rx2 从 orders 里面接受任务,处理完成后再使用 lunches_tx2 发送给  lunches
    let alice_handle = thread::spawn(|| cafeteria_worker("alice", orders_rx2, lunches_tx2));
    let zack_handle = thread::spawn(|| cafeteria_worker("zack", orders_rx, lunches_tx));

    for order in vec![
        "polish dog",
        "caesar salad",
        "onion soup",
        "reuben sandwich",
    ] {
        println!("ORDER: {}", order);
        // orders 只有 1 个 sender(主线程)
        let _ = orders_tx.send(order);
    }
    // 不会清空已经发送到队列的数据,但会关闭这个 sender。之后,一旦队列所有的 senders 都已经关闭,消费者的循环会结束
    drop(orders_tx);

    // lunches 只有 1 个 receiver(主线程)
    for lunch in lunches_rx {
        println!("Order Up! -> {:?}", lunch);
    }

    // 最后,简单的退出子线程
    let _ = alice_handle.join();
    let _ = zack_handle.join();
}
Arc
Arc<T>:原子引用计数Arc<T>是一种「智能指针」,和Rc<T>功能上类似,不同之处只是因为是原子计数,所以能保证线程安全- 对一个分配在堆上的 T 值,可以有多个
Arc<T>指针指向这个 T 值。只有当指向这个 T 值的所有指针都被销毁后,这个 T 值才也被销毁(引用计数为 0)
一个简单的例子:
1
2
3
4
5
6
7
8
9
10
11
12
13
14
15
16
17
18
19
20
use std::thread;
use std::sync::Arc;
use std::time::Duration;

fn main() {
    // foo 指向一个值
    let foo = Arc::new(vec![0]);
    // bar 也指向这个值(也就是引用计数加一)
    let bar = Arc::clone(&foo);

    // 启动一个子线程,这个子线程内部,会在 20 毫秒后,发生一次 move,使用这个值,然后引用计数减一
    thread::spawn(move || {
        thread::sleep(Duration::from_millis(20));
        println!("{:?}", *bar);
    });

    // 主线程会立即进行 move,使用这个值,然后引用计数减一
    // 但此时引用计数还没有被减到 0,所以这个值在主线程执行之后不会被销毁
    println!("{:?}", foo);
}
- 默认场景
Arc<T>不能是可变的(mut)。如果需要可变,可以配合 Mutex 使用
一个简单的配合 Mutex 使用的例子:
1
2
3
4
5
6
7
8
9
10
11
12
13
14
15
16
17
18
19
20
21
22
23
24
25
26
27
28
29
30
use std::sync::{Mutex, Arc};
use std::thread;

fn main() {
    let counter = Arc::new(Mutex::new(0));
    let mut handles = vec![];

    for _ in 0..10 {
        // 引用计数加一
        let counter = Arc::clone(&counter);
        // 启动一个新子线程,子线程内部操作获取 Mutex 的 lock,然后对其中的数据 num 进行先读后写
        // 这里不能直接使用 Mutex,而是要套一层 Arc;
        // 因为直接使用 Mutex 的话,一旦前一次循环把 Mutex 的值 move 走,后面的循环就不能再使用这个 Mutex
        let handle = thread::spawn(move || {
            let mut num = counter.lock().unwrap();

            *num += 1;
            // 当前线程结束后,会释放 lock,其它子线程能再获取这个 lock
        });
        handles.push(handle);
    }

    // 等待所有子线程完成
    for handle in handles {
        handle.join().unwrap();
    }

    // 最后输出:Result: 10
    println!("Result: {}", *counter.lock().unwrap());
}
async
先明确几个概念:
- Future:对计算本身的抽象(重点关注 what:计算什么)
- Future 只是描述计算本身:”开始做 X,等到 X 做成功后,再做 Y“(而不是「过程式」的运行一段代码:”先执行 X,执行 X 成功后,执行 Y“)
- 简单点说,就是用来描述一个状态机
- Future 本身不执行代码,Future 只有配合 Executor 才能真正的把代码运行起来,推进状态机
- Future 只是描述计算本身:”开始做 X,等到 X 做成功后,再做 Y“(而不是「过程式」的运行一段代码:”先执行 X,执行 X 成功后,执行 Y“)
- Executor:用来真正的把 Future 执行起来(重点关注:when & how:计算什么时候执行,怎么执行)
- 当前 Rust 语言本身只定义 Future 等异步组件相关的 traits,Executor 的实现由异步运行时(async_std,tokio 等开源库)负责
Future
Rust 中,Future 是一个 trait,其定义大致(简化版)如下:
1
2
3
4
trait Future {
    type Output;
    fn poll(&mut self) -> Poll<Self::Output>;
}
其中 Poll 的定义大致如下:
1
2
3
4
5
6
enum Poll<T> {
    // Future 完成时返回 Ready
    Ready(T),
    // Future 还没有完成的话,返回 Pending
    Pending
}
When a future eventually returns Poll::Ready(T), we say that the future resolves into a T
翻译:当一个 Future 实例完成后,会返回 Poll::Ready(T),这时我们可以说这个 Future 实例被 resolve 成一个类型 T 的返回值
为了更容易理解,Future 还可以分为 2 类:
- leaf Futures(底层 Future):直接封装某种 IO 操作的异步调用(由 async_std,tokio 等开源库实现)。tokio 库的例子:
1
2
// 异步的创建 socket 连接,并返回一个 **leaf-future**:stream
let mut stream = tokio::net::TcpStream::connect("127.0.0.1:3000");
- non-leaf Futures(非底层 Future):多个 Futures 组合起来描述一个异步任务,事实上是一个状态机(开发者进行开发)。例如:
1
2
3
4
5
6
7
8
9
10
11
12
13
14
15
16
17
#![allow(unused)]

fn main() {
// 创建了一个异步任务(事实上是一个有 4 个状态的状态机)
// 其中用到了 async/.await(这里只是先举例,接下来会对它们详细介绍)
// 最后成功的构建出一个 non-leaf Future
    let non_leaf = async {
// 状态 1:创建 socket 连接。这里使用了一个 leaf Future,并进行等待
        let mut stream = TcpStream::connect("127.0.0.1:3000").await.unwrap();
// 状态 2: socket 连接成功
        println!("connected!");
// 状态 3:异步写文件,并等待中
        let result = stream.write(b"hello world\n").await;
// 状态 4: 写完成
        println!("message sent!");
    };
}
async/.await
怎么创建一个 non-leaf 类型的 Future 来描述异步任务(状态机)?Rust 提供了 async/.await 机制供开发者使用,可以利用它们构建一个描述异步任务的 Future。
先分别给一下同步读文件和异步读文件的例子,对比一下看看。
同步:
1
2
3
4
5
6
7
8
9
10
11
12
#![allow(unused)]

fn main() {
    use std::{fs::File, io, io::prelude::*};

    fn read_file(path: &str) -> io::Result<String> {
        let mut file = File::open(path)?;
        let mut contents = String::new();
        file.read_to_string(&mut contents)?;
        Ok(contents)
    }
}
异步(使用 async_std 异步运行时库):
1
2
3
4
5
6
7
8
9
10
11
12
13
14
15
16
17
18
19
20

#![allow(unused)]

fn main() {
    extern crate async_std;
    use async_std::{fs::File, io, io::prelude::*};

    // 实际上时返回一个 Future:Future<Output = io::Result<String>>
    async fn read_file(path: &str) -> io::Result<String> {
        // 可以把整个 read_file 异步函数理解成一个状态机。

        // File::open(path) 本身返回一个 Future
        // .await 是关键,使用了 .await 后,当真正执行到这里时,状态机进入等待状态
        // 直到 open 成功后,能拿到 Ready(T) 中的 T:file。当前状态结束,状态机继续推进到下个状态
        let mut file = File::open(path).await?;
        let mut contents = String::new();
        file.read_to_string(&mut contents).await?;
        Ok(contents)
    }
}
NOTE:如果 executor 有多个线程,那么 Future 恢复执行后有可能会到另外一个线程里去执行,需要注意线程安全(互斥和死锁)
- 通过 async/.await 机制创建异步任务(也就是 non-leaf 类型的 Futures)的惯用法:
- 开发者使用 async fn 来定义一个异步函数,异步函数返回一个 non-leaf 类型的 Future
- 然后需要由异步运行时库来真正执行这个 Future
- 在异步函数内部,需要使用「异步」版本的 IO 函数(由异步运行时提供)
- 「异步」版本的 IO 函数不会直接返回 IO 操作结果,而是会返回一个异步 IO Future(也就是 leaf Futures)
- 再配合 .await 使用异步 IO Future,执行时等待异步 IO 成功后,会返回异步 IO 的结果
- 开发者使用 async fn 来定义一个异步函数,异步函数返回一个 non-leaf 类型的 Future
- 生命周期
- async fn 的入参如果是 non-‘static 参数(非 static 生命周期的参数),那么这个 async fn 返回的 Future 的生命周期需要被限制在函数入参的生命周期之内
- 换句话说,当在这个 Future 上做 .await 的时候,当初调用这个 async fn 时的入参的生命周期必须仍然有效
- async fn 的入参如果是 non-‘static 参数(非 static 生命周期的参数),那么这个 async fn 返回的 Future 的生命周期需要被限制在函数入参的生命周期之内
- async move 代码块:
1
2
3
4
5
6
7
8
9
10
// `async move` block:
// 如果某个 `async move` block 使用了外部的 my_string 这个变量后, 其他的 `async move` block 就不能使用这个变量了

fn move_block() -> impl Future<Output=()> {
    let my_string = "foo".to_string();
    async move {
        // ...
        println!("{}", my_string);
    }
}
Pin
Pin 机制最重要的用途就是用来保证 Rust 异步机制的安全。
本节深入介绍 Pin 的细节。
可移动
进入本节之前,建议参考 move 对 move 的概念进行回顾。
用一个例子再详解一下 move 的细节:
1
2
3
4
5
6
7
8
9
10
11
12
13
14
#![allow(unused)]

fn main() {
    // s1 (变量) 是 String `hello` (值) 的 owner
    // 底层的实现大概是:`hello` 被存放在分配在 heap 上的空间
    // s1 是个肥指针:记录了「字符串长度」,「字符串存放空间地址」等信息
    let s1 = String::from("hello");

    // 进行 move:s1 记录的信息被 copy 给了 s2(「字符串长度」,「字符串存放空间地址」)
    // 但字符串内容(`hello`)本身地址不会变动
    // 移动以后可以使用 s2 完全没有问题
    // 这是因为 String `hello` 本身的地址没有变化,可以通过 s2 被安全的继续使用
    let s2 = s1;
}
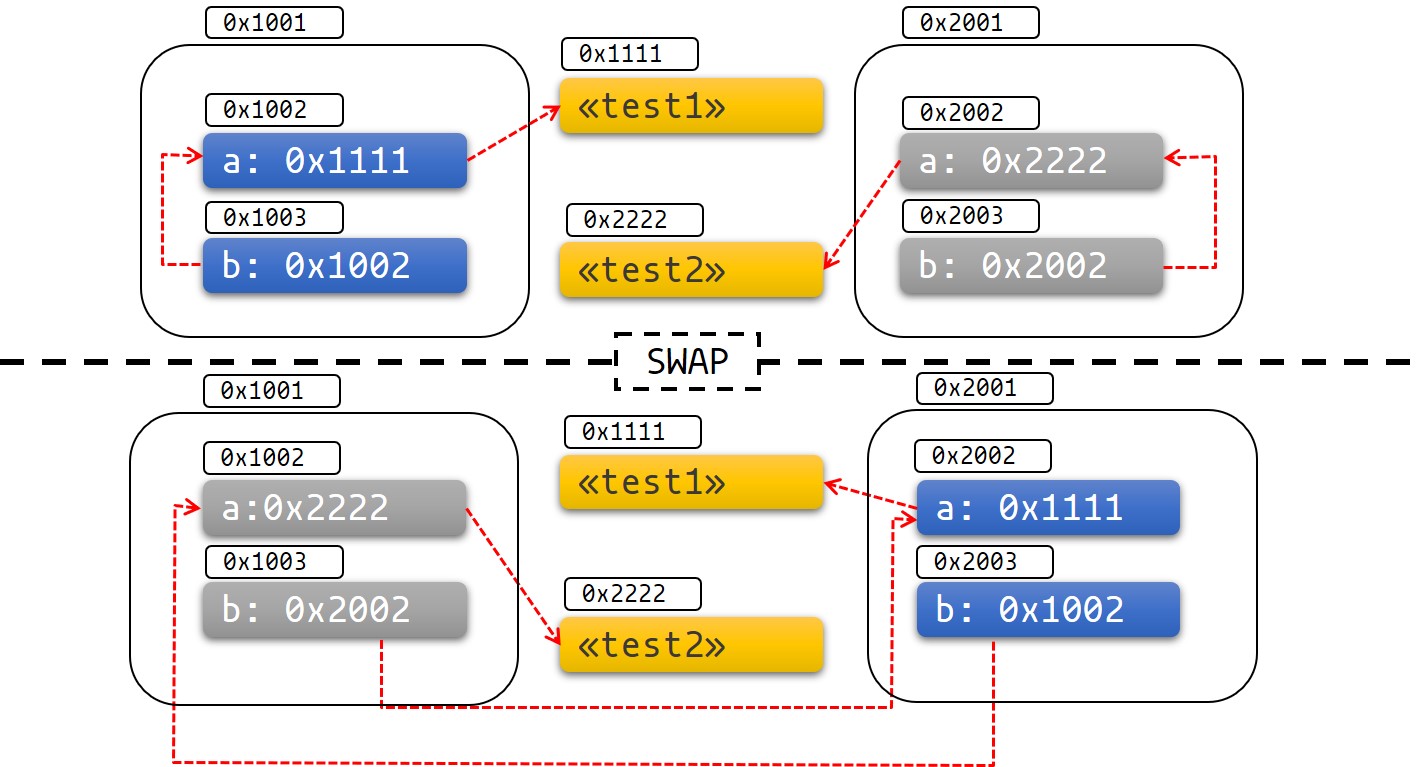
上面例子中的 s1 move 到 s2 具体动作如下图(从 TRPL 书摘录)所示:

就上面的例子来说,String 类型是一个「可移动」(movable)类型。
可移动(movable):所谓一个类型「可移动」,是指一旦拿到这个类型的「值」的 ownership 或 &mut(独占指针),并进行 move 操作,而不会引起问题(不会发生未定义行为)
正常来说,就像上面的 String 类型,Rust 中的所有类型都应该是「可移动」的。
但有例外的场景,某些类型被移动后,会有问题。比如对 Self-Referential Structs(自引用 structs)类型进行 move 就可能引起问题(发生未定义行为)。
举个 Self-Referential Structs 的例子(一个字段指向另外一个字段):
1
2
3
4
struct Test {
    a: String,
    b: *const String,
}
自引用 structs 的 move 问题的细节请参考:Pinning in Detail,看了它里面的图就一目了然了:
总之 Self-Referential Structs 可能会引起 move 后的指针无效问题。该问题可能的解决方法有:
- 每次 move 时,修改指针指向的地址;但这个方法会影响运行时的性能,代价较高
- 指针不储存绝对地址,只储存偏移量;这样需要编译器针对 Self-Referential Structs 做专门的处理,编译器的实现会比较复杂
- Rust 采用 Pin 机制来解决问题:开发者负责把不能被 move 的类型标记出来;利用类型系统对这些被标记了的类型进行限制:使得没有办法对这些类型做 move 动作
- 运行时付出的代价为 0,不影响性能
- 代价就是开发者需要学习 Pin 的用法
Pin 的定义
核心理念:
要限制一个类型 T 不能被 move,也就是要对这个类型 T 的访问进行限制:只要不能拿到到这个类型 T 的 ownership 或者 &mut T(独占指针),也就不能对这个类型 T 做 move 操作。
在 Pin 机制中,只要利用 Pin 把这个类型 T 包起来(或者说屏蔽起来)就能实现这个限制效果。
Pin 的定义:
1
2
3
4
// 一个包了指针的 struct
pub struct Pin<P> {
    pointer: P,
}
其中:
- Pin 自己是一个指针,Pin 本身实现了 Deref 和 DerefMut,
- P 必须是一个指针,也就是实现了 Deref 或 DerefMut 的类型。例如:
Box<T>
怎么利用 Pin 把需要限制的类型 T 包起来(屏蔽起来)?
- 因为 P 只能包一个指针,所以先要构建一个指向 T 的指针 P。可以构建 2 种指针:
- &mut T:「可变引用」实际上就是 T 的「独占指针」
- Box<T>:使用智能指针 Box
- 然后再用 Pin 把构建好的指针类型 P 包起来。既然有 2 种指针,那么也有 2 种 Pin:
- Pin<&mut T>:但这种坑多,使用起来需要很小心,先不推荐使用这种方法
- Pin<Box<T»:可以使用标准库 Box::pin 函数来构建。得到一个在 heap 上的 T 的值,然后这个值被 Pin 屏蔽住,推荐使用这种方法
Unpin and !Unpin
上一节已经说明了通过 Pin 机制,可以把「不可移动」的类型 T 封装到 Pin 中,这样就没有办法获取到 T 的 ownership 或者 &mut T(独占指针),进而保证不能对 T 进行 move。
但实际上 Pin 是和 Unpin trait 组合在一起使用的,所以还需要详细介绍 Unpin(以及 !Unpin)的概念。
Unpin trait 是一种 auto trait。简单点说,Rust 中的各种类型,要么实现了 Unpin,要么实现了 !Unpin(事实上,Rust 中大多数类型都已经默认实现了 Unpin trait)。
配合 Unpin 和 !Unpin,Pin 的使用原则如下:
原则一:
Unpin Types can be safely moved after being pinned。
如果类型 T 是「可移动」类型,那么需要给该类型 T 实现 Unpin trait。
一旦类型 T 实现了 Unpin trait,那么即使用 Pin 包住这个类型 T(例如 Pin<&mut T>),也不会对 T 有屏蔽效果。
还是可以从 Pin 中拿到 T 的 ownership 或者 &mut T(独占指针),并进行 move。
原则二:
Guarantee that an object implementing !Unpin won’t ever be moved。
只有当 Pin 包住的类型 T(例如 Pin<Box<T» 中的 T)实现了 !Unpin trait,才无法获取到 T 的 ownership 或者 &mut T(独占指针),从而达到了对 T 的屏蔽效果,没办法对类型 T 进行 move。
原则三:
一个 struct 类型 T 只要有一个 field 是 !Unpin 的,这个 struct 类型 T 就是 !Unpin 的。
而 Rust 中绝大多数正常类型,都是「可移动」的,默认都已经实现了 Unpin。
比如 String 类型,也已经默认实现了 Unpin。按照上面的「原则一」,即使被 Pin 包住,也不会并屏蔽,可以使用多种方法从 Pin 中拿到 String 进行操作:
1
2
3
4
5
6
7
8
9
10
11
12
13
14
15
16
#![allow(unused)]

fn main() {
    let mut string = "Pinned?".to_string();

    // 构建 Pin<&mut T>
    let mut pinned: Pin<&mut String> = Pin::new(&mut string);
    // String 实现了 Unpin,所以不会被 Pin 屏蔽
    // 可以直接从 Pin<&mut T> 拿到内部真正的 T String,进行操作
    pinned.push_str(" Not");

    // 也提供了 Pin::into_inner 方法来返回指针 P(相当于可以把外层包的 Pin 去掉)
    Pin::into_inner(pinned).push_str(" so much.");
    let new_home = string;
    assert_eq!(new_home, "Pinned? Not so much.");
}
特别注意:
- Box<T> 也是「可移动」的,也实现了 Unpin
- Box<T> 是一个 heap 上的指针,所以可以安全的移动
- 但 T 可能「不可移动」,可能实现了 !Unpin
- Pin<Box<T» 也是「可移动」的,也实现了 Unpin
- Pin 的 field 是 Unpin 的 Box<T>,所以 Pin 也是 Unpin 的
- 但 T 可能「不可移动」,可能实现了 !Unpin
在 Rust 中,真正实现了 !Unpin trait 的只有 2 个类型(这里只先提一下,下一节会详细讲):
- Future 转换为状态机时,编译器生成 Self-Referential Structs 来保存状态机上下文数据,编译器会给这些 Self-Referential Structs 实现 !Unpin trait
- 标准库中的 std::marker::PhantomPinned 类型也实现了 !Unpin trait
Future and Pin
- Rust 里面,使用 Future 来描述一个状态机
- 编译器把 async fn 或 async block 转换为状态机代码时,使用到了 Self-Referential Structs
- 后续使用该 Future 的人如果不小心对这个 Future 进行了 move,就会出问题
- 所以需要使用 Pin 机制来保证 Future 的安全(不会被 move)
先简单举例说明怎么把异步代码(async fn 或 async block)转换为状态机(更多细节请参考:The Async/Await Pattern)。
这里举个 async block 的简单例子:
1
2
3
4
5
6
7
8
9
10
#![allow(unused)]

fn main() {
    async {
        let mut x = [0; 128];
        let read_into_buf_fut = read_into_buf(&mut x);
        read_into_buf_fut.await;
        println!("{:?}", x)
    }
}
编译器在对这个 async block 生成状态机:
- 构建一个有 3 个状态的状态机:StartState,WaitingOnReadState,EndState
- 对每个状态,需要定义对应的 struct 来保存该状态的上下文信息:
1
2
3
4
5
6
7
8
9
10
11
12
13
14
15
// 整个 async block 被转换为一个 future:
struct AsyncFuture {
    // future 中包括了 async block 内部使用到的数据:
    x: [u8; 128],

    // future 中也需要包含状态机工作时,每个状态的上下文信息(只有记录了每个状态的上下文信息,状态机才能被不断推进)
    // 本例子中,我们只重点关心 WaitingOnReadState 状态的上下文
    waiting_on_read_state: WaitingOnReadState,
}

// 定义一个 WaitingOnReadState 状态的上下文信息的 struct
struct WaitingOnReadState<'a> {
    // 指向了 AsyncFuture 的 `x` 字段,所以 AsyncFuture 是一个 Self-Referential Struct
    buf: &'a mut [u8],
}
可以看出,async block 的状态机的底层实现中,会把 Future 实现为 Self-Referential Structs(自引用 struct),只能利用 Pin 机制来防止使用 Future 的人对 Future 进行 move。
异步运行时
异步运行时由 Rust 社区提供,它们的核心是一个 Reactor 和一个或多个 Executor:
- Reactor 负责封装底层的事件通知,例如 异步 IO,异步 Sleep 等
- Executor 负责执行 Future(前面的小节已经介绍过)
- Executor 和 Reactor 利用 Waker(Rust 标准库定义)进行交互:
- Executor 执行 Future 进行 poll,并把 waker 作为调用时的入参
- Reactor 执行底层 IO 操作,并接收到 waker
- 当 IO 完成时,Reactor 利用 waker 通知 Executor 继续推进 Future 的执行
目前有一些流行的「异步运行时」,本节重点介绍 Tokio(值得注意的是,一旦你的项目选择了某个「异步运行时」,不太可能后续又能切到其他的「异步运行时」)。
main 函数
使用 Tokio 时,需要用 #[tokio::main] 宏。会把 async fn main 转换为 fn main,以及做一些异步环境的初始化工作。最简单的例如:
1
2
3
4
#[tokio::main]
async fn main() {
    println!("hello");
}
异步任务
使用 tokio::spawn 创建「异步任务」。tokio::spawn会返回一个 JoinHandle 对象,然后开发者可以通过 JoinHandle 使用这个「异步任务」。最简单的例子:
1
2
3
4
5
6
7
8
9
10
11
12
13
14
#[tokio::main]
async fn main() {
    // spawn 入参是 async block
    // async block 就是这个「异步任务」要做的事情(本身是返回一个 Future)
    // 返回一个 JoinHandle(handle)对应这个「异步任务」
    let handle = tokio::spawn(async {
        10086
    });

    // JoinHandle 本身也是一个 Future
    // 下面真正的执行这个「异步任务」(执行由「Executor」负责)
    let out = handle.await.unwrap();
    println!("GOT {}", out);
}
Mutex
「异步任务」间数据同步的安全保证,可使用「互斥」。Mutex 的用法可参考之前的小节(Arc)。
更多底层细节
Future trait 真实定义如下:
1
2
3
4
5
6
7
8
9
10
11
12
13
#![allow(unused)]

fn main() {
    use std::pin::Pin;
    use std::task::{Context, Poll};

    pub trait Future {
        type Output;

        fn poll(self: Pin<&mut Self>, cx: &mut Context)
                -> Poll<Self::Output>;
    }
}
详解:
- Output 是 Future 执行完成后返回的值的类型
- 开始调用 poll() 方法之前,必须先用一个 Pin 类型把 Future 包装起来才能调用 poll() 方法
- 用一个 Pin 类型把 Future 包装起来的目的是防止这个 Future 实例被 move
- 由第 3 方异步运行时库提供的 Executor 负责执行 Future:
- 整个状态机由一个最外层 Future,和其它内部 Futures 一起组成
- Executor 先做第一次 poll,启动状态机
- Executor 会继续调用 poll,推进状态机,直到整个任务完成
但如果 Executor 通过循环重试的方式来不断 poll 效率太低。高效的方式是通过某种通知机制,当 Future 已经就绪时,才去做 poll。所以又引入了 Waker:
当 Executor 调用 poll 的时候需要提供一个 Context 参数,这个 Context 参数就包含了 Waker
未来当 Future 完成时,可以获取到 Waker(waker = cx.waker()),然后调用 waker.wake() 来通知 Executor 执行 poll
具体 waker.wake() 要怎么通知,由 Executor 实现:
- 一种可能的实现,就是调用 wake() 把就绪的任务加到就绪队列,Executor 消费就绪队列中已完成任务,进行 poll
- 实现要保证线程安全
先展示一个简单的,不断 wake Executor 做 poll 的例子:
1
2
3
4
5
6
7
8
9
10
11
12
13
14
15
16
17
18
19
20
21
22
23
24
25
26
27
28
29
30
31
32
use std::{
    future::Future,
    pin::Pin,
    task::{Context, Poll},
};

// 这个例子中,我们使用 tokio 作为运行时来执行 Future
#[tokio::main]
async fn main() {
    let fut = MyFuture {};
    println!("Awaiting fut...");
    fut.await;
    println!("Awaiting fut... done!");
}

// 声明一个自己的 Future
struct MyFuture {}

// 实现 Future trait
impl Future for MyFuture {
    // 该 Future 返回 ()
    type Output = ();

    fn poll(self: Pin<&mut Self>, cx: &mut Context<'_>) -> Poll<Self::Output> {
        println!("MyFuture::poll()");
        // 如果没有 wake_by_ref() 的话,poll 就只会被调用一次
        // 现在加上了 wake_by_ref(),每次 poll 时,会再次通知 Executor 进行下一次 poll,Executor 会再次调用 poll
        cx.waker().wake_by_ref();
        // 但该例子中,无论 poll 多少次都返回 Pending,不会返回 Ready:无限次调用 poll
        Poll::Pending
    }
}
执行以后的无限次 poll 的效果如下:
1
2
3
4
5
6
7
8
9
10
$ cargo run --quiet
Awaiting fut...
MyFuture::poll()
MyFuture::poll()
MyFuture::poll()
MyFuture::poll()
MyFuture::poll()
MyFuture::poll()
MyFuture::poll()
MyFutur^C
然后再展示一个例子:启动一秒以后,能返回 Ready 的 Future:
1
2
3
4
5
6
7
8
9
10
11
12
13
14
15
16
17
18
19
20
21
22
23
24
25
26
27
28
29
30
31
32
33
34
35
36
37
38
39
40
41
42
43
44
45
46
47
use tokio::time::Sleep;
use tokio::time::Duration;
use std::{
    future::Future,
    pin::Pin,
    task::{Context, Poll},
};

#[tokio::main]
async fn main() {
    let fut = MyFuture::new();
    println!("Awaiting fut...");
    fut.await;
    println!("Awaiting fut... done!");
}

struct MyFuture {
    // Sleep 是一个 Future,不能直接调用 poll(),
    // 需要 Pin 和 Box 组合起来才能调用 poll(下面一个小节会详细说)
    sleep: Pin<Box<Sleep>>,
}

impl MyFuture {
    fn new() -> Self {
        Self {
            // 使用 tokio 异步版本的 sleep
            // Box::pin 创建一个 Pin<Box<T>,如果 T 没有实现 Unpin 的话,Pin 成功
            // 本例子 Pin<Box<Sleep>> 中的 Sleep 类型就是没有实现 Unpin 的类型
            sleep: Box::pin(tokio::time::sleep(Duration::from_secs(1))),
        }
    }
}

impl Future for MyFuture {
    type Output = ();

    fn poll(mut self: Pin<&mut Self>, cx: &mut Context<'_>) -> Poll<Self::Output> {
        println!("MyFuture::poll()");
        // 这个一个典型的惯用法:Future 的实现里面对另外一个 Future 进行 poll
        //
        // 因为异步版本的 sleep 内部实现了利用 waker 来通知 Executor
        // 所以可以直接对异步版本的 sleep 进行 poll
        //
        // 异步版本的 sleep 的 poll(),需要 Pin 和 Box 组合起来调用 poll()
        self.sleep.as_mut().poll(cx)
    }
}
执行效果如下:
1
2
3
4
5
6
$ cargo run --quiet
Awaiting fut...
MyFuture::poll()
这里会卡 1 秒
MyFuture::poll()
Awaiting fut... done!
- 另外一个之前例子没有覆盖的 Future 内部实现细节:每次 Executor 调用 poll 时,都会传入一个的 waker 参数;poll 的内部需要判断这次的 waker 和之前 poll 被调用时传入的 waker 的值是否匹配。代码大概如下:
1
2
3
4
5
6
7
8
9
fn main() {
    // 获取原先的 waker
    let mut waker = waker.lock().unwrap();
    // 判断原先的 waker 和本次调用传入的 waker 是否匹配
    if !waker.will_wake(cx.waker()) {
        // 如果不匹配,需要 clone 本次传入的值,并记录到 Future 内部
        *waker = cx.waker().clone();
    }
}
closure
- closure 就是匿名函数,可以赋值给变量,也可以作为函数的参数来使用。例如,可以把 closure 作为函数参数的一些库方法:
- Iterator
- thread::spawn
- 一般来说,Rust 会自动推断 closure 用到的类型。但也可以使用「类型标注」标明其类型
1
2
3
4
5
6
7
8
9
10
11
12
13
#![allow(unused)]

fn main() {
    use std::thread;
    use std::time::Duration;

    // 分别标明了参数和返回值的类型:u32
    let expensive_closure = |num: u32| -> u32 {
        println!("calculating slowly...");
        thread::sleep(Duration::from_secs(2));
        num
    };
}
1
2
3
4
5
6
7
8
9
10
fn main() {
    let x = 1;

    // sum 是一个 closure。这个 closure 捕获并使用了作用域中 x 的值(也就是 1)
    // 注意:这里只是定义了 closure,并不会执行。closure 只有在被调用的时候才会真正执行
    let sum = |y| x + y;

    // 执行 sum,计算结果是 3
    assert_eq!(3, sum(2));
}
- closure 会自动 borrow 捕获的值(默认创建一个指向值的引用,又有 2 种可能:「可变引用」和「不可变引用」)
- 只要 closure 自己会在该引用指向的值的之前被 dropped,那么就是符合生命周期规则,没有问题
一个简单的例子:
1
2
3
4
5
6
7
8
9
10
11
fn main() {
    let s = "hello";

    // f 是一个 closure,它捕获 s,并自动进行 borrow
    let f = || {
        println!("{}", s);
    };

    // f 这个 closure 在 s 之前被 dropped,所以这段代码是 OK 的
    f();
}
- 但如果不能保证 closure 自己会在该引用指向的值的前面被 dropped,不能通过编译
- 此时可以考虑使用 move 关键字,使用 move 关键字后,closure 会把捕获的值 move 到 closure 内部,并拿到这个值的 ownership
- 然后当这个 closure 被 dropped 的时候,这个参数的值也会被 dropped
一个简单的例子:
1
2
3
4
5
6
7
8
9
10
11
12
13
fn main() {
    let s = "hello";

    // f 是一个 closure,它捕获到 s,并进行 move,并拿到 s 的 ownership
    let f = move || {
        println!("{}", s);
    };

    f();

    // 之后,当 f 这个 closure 被 dropped,s 也会被 dropped
    // 如果之后还需要使用这个 s,只能在 move 之前 clone 出一份
}
一个进行 clone 之后再使用 closure 的简单例子:
1
2
3
4
5
6
7
8
9
10
11
12
13
14
fn main() {
    let s = "hello";
    let s2 = s.clone();

    // move 的时候,用 s2
    let f = move || {
        println!("{}", s2);
    };

    f();

    // 之后,当 f 这个 closure 被 dropped,s2 会被 dropped
    // 而 s 还可以继续被使用
}
用一些更复杂的例子说明更多的细节:
1
2
3
4
5
6
7
8
9
struct City {
    name: String,
    population: i64,
    country: String,
}

fn sort_cities(cities: &mut Vec<City>) {
    cities.sort_by_key(|city| -city.population);
}
- 按人口降序排序
- 有点像其他语言(Java)中的匿名函数
- 但 Rust 的 closure 和其他语言的匿名函数又有区别
下面的例子,说明了 Closure 相关的生命周期:
1
2
3
4
5
/// Sort by any of several different statistics.
fn sort_by_statistic(cities: &mut Vec<City>, stat: Statistic) {
    // Rust 自动 borrow(自动有一个到 stat 的引用)
    cities.sort_by_key(|city| -city.get_statistic(stat));
}
线程相关的复杂例子:
1
2
3
4
5
6
7
8
9
10
11
12
13
14
use std::thread;

fn start_sorting_thread(mut cities: Vec<City>, stat: Statistic)
                        -> thread::JoinHandle<Vec<City>>
{
    // 定义一个 Closure
    let key_fn = |city: &City| -> i64 { -city.get_statistic(stat) };

    // spawn 新的线程
    thread::spawn(|| {
        cities.sort_by_key(key_fn);
        cities
    })
}
Rust 会提示这段代码编译错误。错误的根源如下:
- 这个新的线程的工作完成之前,stat 和 cities 这 2 个变量都必须存活;但上面的代码按 borrow 的话,没有这个保证
解决方法是利用 move 关键字告诉 Rust 把 stat 和 cities 这 2 个变量 move 到 closure(而不是像前个例子那样走 borrow 逻辑)。代码如下:
1
2
3
4
5
6
7
8
9
10
11
12
fn start_sorting_thread(mut cities: Vec<City>, stat: Statistic)
                        -> thread::JoinHandle<Vec<City>>
{
    // 利用 move 关键字,key_fn closure 获取到 stat 的 ownership
    let key_fn = move |city: &City| -> i64 { -city.get_statistic(stat) };

    // 利用 move 关键字,该 closure 获取到 key_fn 和 cities 的 ownership
    thread::spawn(move || {
        cities.sort_by_key(key_fn);
        cities
    })
}
再特别说明一下把函数作为另外一个函数的入参,和把 closure 作为另外一个函数的入参的区别。
先看一个把函数作为另外一个函数入参的例子:
1
2
3
4
5
6
7
8
9
10
11
12
13
/// Given a list of cities and a test function,
/// 这个 test_fn 就是一个作为入参的函数,其入参是 &City,返回值是 bool:fn(&City) -> bool
/// return how many cities pass the test.
fn count_selected_cities(cities: &Vec<City>, test_fn: fn(&City) -> bool) -> usize
{
    let mut count = 0;
    for city in cities {
        if test_fn(city) {
            count += 1;
        }
    }
    count
}
但是不能把一个 closure 传给这个例子函数 count_selected_cities。因为 count_selected_cities 的入参是函数而不是 closure。
如果需要把 closure 作为入参,需要这样定义 count_selected_cities:
1
2
3
4
5
6
7
8
9
10
11
12
/// 这里的入参 test_fn 是一个 F,其实现了一个 trait:Fn(&City) -> bool
fn count_selected_cities(cities: &Vec<City>, test_fn: F) -> usize
    where F: Fn(&City) -> bool
{
    let mut count = 0;
    for city in cities {
        if test_fn(city) {
            count += 1;
        }
    }
    count
}
也就是说:
fn(&City) -> bool// fn (只能是把函数作为入参)Fn(&City) -> bool// Fn trait (既可以是函数作为入参,也可以是 closure 作为入参)
上面的 Fn 是 Rust 语言支持的 trait。实际上,Rust 一共支持 3 种类型的 closure trait,开发者可以根据具体情况选择使用哪一种:
- FnOnce:当 closure 只能被执行一次时使用
- FnMut:当 closure 会对值(通过 borrow 或者 move 拿到的值)进行修改时使用
- Fn:当 closure 不会对值(通过 borrow 或者 move 拿到的值)进行修改时使用
一个 Fn Mut 的例子:
1
2
3
4
5
6
7
8
9
10
11
12
#![allow(unused)]

fn main() {
    let mut i = 0;

// 这个 closure(incr)就是一个 FnMut:borrow 了 外部值 i 的可变引用
// 所以要在 incr 前面加一个 mut
    let mut incr = || {
        i += 1; // incr borrows a mut reference to i
        println!("Ding! i is now: {}", i);
    };
}
总结:
- Fn closure:没有限制,可以被调用多次。而且所有普通的函数类型:fn 也都是 Fn
- FnMut closure:可以被调用多次,但使用的时候,需要用 mut 标明该 closure
- FnOnce closure:只能被调用一次
这 3 种类型的 closure 使用限制一个比一个严格,它们的从属关系是:Fn 是 FnMut 的子 trait;FnMut 是 FnOnce 的子 trait。
Iterator
概念
先明确几个概念:
- 所谓 Iterator 就是实现了
Iteratortrait 的「类型」。 - 「某个类型可迭代」(iterable)就是指该类型实现了
IntoIterator,也就是对这个「类型」可以通过into_iter()方法获取到「该类型对应的 iterator」。从而可以通过 Iterator 来做遍历操作
for 循环会自动调用「可迭代类型」的 into_iter 获取 iterator;不过也可以直接把一个 iterator 给 for 循环语句:iterator 本身也可以被调用 into_iter 方法(返回 iterator 自己)
参考下面 for 循环的例子:
1
2
3
4
5
6
7
8
9
10
#![allow(unused)]

fn main() {
    let v = vec![6, 7, 8, 9];

    // 实际上 for 并不是作用在 v 上的,实际上是作用在一个 iterator 上的
    for num in v {
        println!("{}", num);
    }
}
实际上 for 并不是作用在 v 上的,实际上是作用在一个 iterator 上的,for 语句会自动调用 vector 的 into_iter 方法:
1
2
3
4
5
6
7
8
9
10
11
12
13
#![allow(unused)]

fn main() {
    let v = vec![6, 7, 8, 9];

    // 显示的调用 vector 的 into_iter 方法返回一个 iterator,
    // 按前面说的,for 语句也可以直接接收 iterator,
    // 之后会 returns owned item
    for num in v.into_iter() {
        println!("{}", num);
    }
    // for 语句后 vector 不再有效(其中 item 的 ownership 已经转移)
}
上面这个例子中,使用了 into_iter 方法后,vector 中 item 的 ownership 已经转移,所以 for 语句后变量 v 不再有效。
再看一个等价于上面 for 循环的例子:
1
2
3
4
5
6
7
8
9
10
11
#![allow(unused)]

fn main() {
    let v = vec![6, 7, 8, 9];

    // vector 的 into_iter 方法返回一个 iterator,之后会 returns owned item
    // 然后使用 for_each 顺序消费这个 iterator 产出的序列中的值
    v.into_iter().for_each(|num| println!("{}", num));

    // vector 不再有效(其中 item 的 ownership 已经转移)
}
再简单介绍一下 迭代器 Trait(iterator trait):
1
2
3
4
5
6
7
8
9
10
11
12
13
14
#![allow(unused)]

fn main() {
    pub trait Iterator {
        // 这里的 Item 类型是 Iterator 返回的序列中元素的类型
        type Item;

        // Next 一次返回迭代器中的一项,封装在 Some 中,当迭代器结束时,它返回 None
        fn next(&mut self) -> Option<Self::Item>;

        // 此处省略了方法的默认实现
    }
}
- 注意:next 需要一个可变引用(&mut);也就是说,每次调用 next 会消费(consume)该序列中的一项,实际上 iterator 的状态被改变(mut)了
- Rust 中的很多集合类型(比如前面例子中的 vector),会默认实现另外一个 trait:IntoIterator,然后就可以调用这个 trait 的方法 into_iter 得到这个集合上的 iterator
获取 iterator
Rust 的标准库为了方便开发者,为各个「Collect 类型」提供了多种 Iterator。
其中,为大多数 Collect 类型提供了另外 2 个方法来获取 iterator:
- iter() 方法:返回的 iterator 获取到序列中 item 的不变引用,对 item 只读不修改(不转移 item 的 ownership)
- iter_mut() 方法:返回的 iterator 获取到序列中 item 的可变引用,可以修改 item(不转移 item 的 ownership)
一个在 vector 类型上使用 iter() 的例子:
1
2
3
4
5
6
7
8
9
10
11
12
13
#![allow(unused)]

fn main() {
    let v = vec![4, 20, 12, 8, 6];
    // iterator 本身可变(mut),但处理其中的 item 时,是一个不变引用:&i32
    let mut iterator = v.iter();
    assert_eq!(iterator.next(), Some(&4));
    assert_eq!(iterator.next(), Some(&20));
    assert_eq!(iterator.next(), Some(&12));
    assert_eq!(iterator.next(), Some(&8));
    assert_eq!(iterator.next(), Some(&6));
    assert_eq!(iterator.next(), None);
}
总之,大多数场景下,
iter()方法可以遍历使用 item 的「引用」。但到具体某个「Collect 类型」是不是确实是返回 item 的「引用」可以参考文档。
另外,要拿到某个类型的 Iterator,也可以直接调用 into_iter() 方法。当如先需要查询文档确认该「类型」是否实现了 IntoIterator Trait)。其中大多数「Collect 类型」都实现了几种 IntoIterator Trait,例如:
- &T:只读,不转移 ownership。在「不变引用」上调用 into_iter() 的场景
- &mut T:读写,不转移 ownership。通常在「可变引用」上调用 into_iter() 的场景。比如常用的
(&mut vector).into_iter() - T:转移 ownership。例如:直接通过「值」来调用 into_iter() 的场景
总之,通常在不同的场景可以使用 3 种调用 into_iter() 的方式(不过具体还是要查文档):
1
2
3
for element in &collection { ... }
for element in &mut collection { ... }
for element in collection { ... }
使用 iterator
使用 iterator 需要 Iterator Consumer 和 Iterator Adaptor。
- Iterator Consumer:可以通过 Iterator Consumer 不断调用 next() 方法,对一个 iterator 进行消费。例如:
- sum,max,min
- fold
- for_each
- collect
参考具体文档熟悉更多的 consumer。
- Iterator Adaptor:把当前 iterator 变为另外类型的 iterator。例如:
- map
- filter
- filter_map 和 flat_map
参考具体文档熟悉更多的 Iterator Adaptor。
map
map 通过对 iterator 的 items 实施一个 closure 来对 iterator 进行转换。
一个例子:
1
2
3
4
5
6
7
8
// str::trim 作用到 iterator 的 items 上,转换出另外一个 iterator
// 最后再调用 collect() 把 iterator 转换为 vector
let text = " ponies \n giraffes\niguanas \nsquid".to_string();
let v: Vec<&str> = text.lines()
    .map(str::trim)
    .collect();

assert_eq!(v, ["ponies", "giraffes", "iguanas", "squid"]);
flattern
对 iterator 使用 flattern 的前提是这个 iterator 中的 item 实现了 IntoIterator(也就是可以把 item 转成 iterator)
这样,就可以利用 flattern 用来把一个 中的所有 items 「拉平」,从「二维」转换成「一维」。
例如,Option 已经实现了 IntoIterator,那么我们可以这样使用 flattern :
1
2
3
4
5
assert_eq!(vec![None, Some("day"), None, Some("one")]
               .into_iter()
               .flatten()
               .collect::<Vec<_>>(),
               vec!["day", "one"]);
macros
Rust 中的宏分以下几种:
- declarative macros:使用 macro_rules! 来定义宏(据说未来会有更好的机制来替换 macro_rules!)
- procedural macros。翻译成「过程宏」,用代码生成代码。又分成 3 种:
- derive。derive 只能用于结构体和枚举
- attribute(Attribute-like)。可以用于任何地方。
- function(function-like)
macro rules
给个例子(利用宏 vec! 来初始化 vector):
1
2
3
4
5
#![allow(unused)]

fn main() {
    let v: Vec<u32> = vec![1, 2, 3];
}
vec! 定义如下:
1
2
3
4
5
6
7
8
9
10
11
12
13
14
15
16
17
#![allow(unused)]

fn main() {
    #[macro_export]
    // vec 是宏的名字
    macro_rules! vec {
      ( $( $x:expr ),* ) => {
          {
              let mut temp_vec = Vec::new();
              $(
                  temp_vec.push($x);
              )*
              temp_vec
          }
      };
    }
}
- 需要用 #[macro_export] 属性来标识该宏可用
- ( $( $x:expr ),* ) 用于模式匹配。例如,可以匹配上面例子中的:[1, 2, 3] 会被匹配出 3 个值:1、2、3,对应到宏定义中的 $x
- => 类似 match 语句,当模式匹配成功以后,就执行 => 后面的代码
最终,会生成类似以下的代码:
1
2
3
4
5
6
7
fn main() {
    let mut temp_vec = Vec::new();
    temp_vec.push(1);
    temp_vec.push(2);
    temp_vec.push(3);
    temp_vec
}
unsafe
Rust 里面可以通过 2 种方法来标明代码是 unsafe 代码:unsafe block 和 unsafe function。
Unsafe Block
把 unsafe 关键字放在 block 代码块之前,就标明了一块 unsafe block:
1
2
3
4
5
fn main() {
    unsafe {
        String::from_utf8_unchecked(ascii)
    }
}
如果这个代码块前面没有 unsafe 关键字,Rust 编译的时候会提示失败:from_utf8_unchecked 方法只能在 unsafe 下被使用。
unsafe block 解锁了 5 个限制:
- 可以在 unsafe block 内使用 unsafe 函数
- 可以 defer raw 指针
- 可以存取 union 中的字段
- 可以存取「可变 static 变量」(但这样需要由你自己来保证该变量的线程安全)
- 可以存取由 Rust「外部函数接口」(FFI)定义的函数和变量
一旦使用了 unsafe block 也就是提醒开发人员注意,这部分代码的安全性不再由 Rust 来保证了:
- 避免随意用了 unsafe block,但又完全不了解 block 中的风险所在
- 在做 code review 时,需要把 unsafe block 特别标注出来,特别对待
- 在打算使用一个 unsafe block 之前,先自己确认一下是否是真的需要使用 unsafe。例如,如果是出于更好性能考虑,先调研一下,是否真的能提升性能,或者是否存在 Rust safe 的方案来同样达到提升性能的目的
给一个 unsafe block 的例子:
1
2
3
4
5
6
7
8
9
10
11
12
13
14
15
16
17
18
19
20
21
22
23
24
25
26
27
28
29
30
31
32
33
34
35
36
37
38
mod my_ascii {
    /// An ASCII-encoded string.
    #[derive(Debug, Eq, PartialEq)]
    pub struct Ascii(
        // This must hold only well-formed ASCII text:
        // bytes from `0` to `0x7f`.
        Vec<u8>
    );

    impl Ascii {
        /// Create an `Ascii` from the ASCII text in `bytes`. Return a
        /// `NotAsciiError` error if `bytes` contains any non-ASCII
        /// characters.
        /// 这里保证了数据的正确,一旦数据不是 ASCII 格式,抛 Err
        pub fn from_bytes(bytes: Vec<u8>) -> Result<Ascii, NotAsciiError> {
            if bytes.iter().any(|&byte| !byte.is_ascii()) {
                return Err(NotAsciiError(bytes));
            }
            Ok(Ascii(bytes))
        }
    }

    // When conversion fails, we give back the vector we couldn't convert.
    // This should implement `std::error::Error`; omitted for brevity.
    #[derive(Debug, Eq, PartialEq)]
    pub struct NotAsciiError(pub Vec<u8>);

    // Safe, efficient conversion, implemented using unsafe code.
    impl From<Ascii> for String {
        fn from(ascii: Ascii) -> String {
            // If this module has no bugs, this is safe, because
            // well-formed ASCII text is also well-formed UTF-8.
            // 这里由程序员保证 unsafe block 的安全:这里 使用 unsafe 函数 from_utf8_unchecked 是安全的
            // 因为如果是 ASCII,也就是 UTF-8
            unsafe { String::from_utf8_unchecked(ascii.0) }
        }
    }
}
Ascii 类型可以被使用在 safe 的环境,例如:
1
2
3
4
5
6
7
8
9
10
11
12
fn main() {
    use my_ascii::Ascii;

    let bytes: Vec<u8> = b"ASCII and ye shall receive".to_vec();
    // This call entails no allocation or text copies, just a scan.
    let ascii: Ascii = Ascii::from_bytes(bytes).unwrap();

    // We know these chosen bytes are ok.
    // This call is zero-cost: no allocation, copies, or scans.
    let string = String::from(ascii);
    assert_eq!(string, "ASCII and ye shall receive");
}
Unsafe Function
Unsafe Function:
- 函数定义前面加一个 unsafe 关键字,就定义一个 unsafe function。unsafe function 的函数体就是一个 unsafe block
- 只能在 unsafe block 里面调用 unsafe function
- 一旦定义了一个 unsafe function,就是告诉它的调用者必须按照约定来调用该函数,否则就可能出现 UB
给个例子:
1
2
3
4
5
6
7
8
9
10
11
12
13
14
15
16
17
18
19
// This must be placed inside the `my_ascii` module.
impl Ascii {
    /// Construct an `Ascii` value from `bytes`, without checking
    /// whether `bytes` actually contains well-formed ASCII.
    ///
    /// This constructor is infallible, and returns an `Ascii` directly,
    /// rather than a `Result<Ascii, NotAsciiError>` as the `from_bytes` /// constructor does.
    ///
    /// # Safety
    ///
    /// The caller must ensure that `bytes` contains only ASCII
    /// characters: bytes no greater than 0x7f. Otherwise, the effect is
    /// undefined.
    /// 也就是说,必须由调用者来保证安全性。
    /// 由调用者来保证这个 Safety 声明:bytes 参数必须是合法的 ASCII 字符串
    pub unsafe fn from_bytes_unchecked(bytes: Vec<u8>) -> Ascii {
        Ascii(bytes)
    }
}
2 个关键事实:
- 在进入 unsafe block 之前的代码如果存在 bug,可能就会破坏协议;也就是说,协议被破坏,可能的原因不单是 unsafe block 本身里面有问题,unsafe block 之前的代码存在问题也会破坏协议
- 如果出现了 UB,UB 引起的问题不一定在 unsafe block 中爆出来,而是有可能在 unsafe block 之后才爆出来
一旦使用了 unsafe block,就是告诉 Rust:信任我,我保证所有都 OK。
但这种「保证」依赖所有会影响 unsafe block 的因素是否 OK。
同时,一旦出现 UB,UB 引发的问题可能出现在任何被这个 unsafe block 影响的地方。
使用 unsafe block,还是使用 unsafe function?
如果能保证只要正常使用就不会破坏 Rust 的安全性,就不需要指明函数是 unsafe 的。否则,才需要使用 unsafe function,并提供安全协议给其调用者。
Unsafe Trait
Unsafe Trait:如果一个 trait,需要在实现时遵循一个「契约」,同时这个「契约」需要开发者来保证,而 Rust 不能 check 这个「契约」;那么这个 trait 就是 Unsafe Trait:
- 在实现 Unsafe Trait 时,必须把实现标为 unsafe 的
- 如果把一个函数的类型变量绑定到一个 Unsafe Trait 上,那么这个函数本身也肯定是 unsafe。而这个 unsafe 函数的「契约」肯定就会和 Unsafe Trait 的「契约」相关联
- 一个例子:std::marker::Send 就是一个 Unsafe Trait,而且 std::marker::Send 不会有任何方法,这个 trait 只是用来标记实现了这个 trait 的类型必须满足能被安全移动到其他线程的「契约」
Raw Pointer
Rust 中有 2 类 Raw Pointers:
*mut T:允许修改该指针指向的数据*const T:只能读取该指针指向的数据,不能通过这个指针修改其指向的数据
通过对「引用」进行转换来创建 Raw Pointer,然后用 * 操作符来对 Raw Pointer 做「解引用」。例如:
1
2
3
4
5
6
7
8
9
10
11
12
13
14
15
16
fn main() {
    let mut x = 10;
    // 把 &mut 转成 *mut
    let ptr_x = &mut x as *mut i32;

    let y = Box::new(20);
    // 先把 y 解成 *y,然后把 &*y 转换成 *const
    let ptr_y = &*y as *const i32;

    // 解 Raw 指针操作必须 unsafe
    unsafe {
        *ptr_x += *ptr_y;
    }

    assert_eq!(x, 30);
}
注意:只有对「Raw 指针」进行 dereference(解引用)是 unsafe,其他操作(比如创建 Raw Pointer)是安全的。
不能再把「Raw 指针」转回成「引用」,只能 borrow 解「Raw 指针」的结果。
下面看一个例子:
1
2
3
4
5
6
7
8
9
10
11
12
13
14
15
16
17
18
19
20
21
22
23
24
25
26
27
28
29
30
31
32
33
34
35
36
37
38
39
40
41
42
43
44
45
46
47
48
49
50
51
52
53
/// 如果某个类型的值是 2-byte 对齐的,可以使用一个技巧:
/// 把一个 bool 值(true or false)也存在这个单个值里面。
mod ref_with_flag {
    use std::marker::PhantomData;
    use std::mem::align_of;

    /// A `&T` and a `bool`, wrapped up in a single word.
    /// The type `T` must require at least two-byte alignment.
    pub struct RefWithFlag<'a, T> {
        ptr_and_bit: usize,
        behaves_like: PhantomData<&'a T> // behaves_like 字段不占用内存空间
    }

    impl<'a, T: 'a> RefWithFlag<'a, T> {
        pub fn new(ptr: &'a T, flag: bool) -> RefWithFlag<T> {
            // 如果这个类型不是 2-byte 对齐的,直接失败
            // 如果 %2 为 0 的话,实际上就可以用最后一个 bit 位来存放 bool 是 true 还是 false
            assert!(align_of::<T>() % 2 == 0);
            RefWithFlag {
                // ptr 是类型的值的「不可变引用」,borrow 进来的
                // 把 ptr 转成指向该类型的「不变」raw pointer,再强转成 usize
                // 把 bool 值也强转成 usize
                // 然后把这 2 个 usize 的值做「或」操作
                // 这样就实现了用 raw pointer 的最后一个 bit 位来存放 bool 的值:
                ptr_and_bit: ptr as *const T as usize | flag as usize,
                behaves_like: PhantomData
            }
        }

        pub fn get_ref(&self) -> &'a T {
            unsafe {
                // 恢复原先的指针值(恢复最后一个 bit 位)
                let ptr = (self.ptr_and_bit & !1) as *const T;
                // 解引用,恢复原先的类型的值
                &*ptr
            }
        }

        pub fn get_flag(&self) -> bool {
            // 通过最后一个 bit 位的值来获取 bool 是 true 还是 false
            self.ptr_and_bit & 1 != 0
        }
    }
}

// 使用 RefWithFlag
fn main() {
    use ref_with_flag::RefWithFlag;
    let vec = vec![10, 20, 30];
    let flagged = RefWithFlag::new(&vec, true);
    assert_eq!(flagged.get_ref()[1], 20);
    assert_eq!(flagged.get_flag(), true);
}
上面这个例子的一些细节:
- 上面这个技巧首先基于一个事实:raw pointer 和 usize 是可以安全的来回转换的
- 在 get_ref 中,先用 * 操作符对 raw pointer 进行 deference;然后再用一个 & 对这个 deference 的结果进行 borrow
- Rust 中,对一个指针的 referent 进行 borrow,可以得到一个不受「生命周期」规则约束的「引用」。但给 Rust 标记出精确的「生命周期」能避免引起错误,所以 get_ref 的返回值,标记了其返回值的「生命周期」和 RefWithFlag 的「生命周期」相同:’a
- A pointer’s referent object is the object that it is intended to reference
- PhantomData 作为「影子数据」不占用内存空间;但这个例子中的 PhantomData 字段不可或缺,否则编译失败
- struct 中存在引用字段的话,struct 本身不能存活超过这些引用字段所引用的值的「生命周期」,否则就会产生悬挂指针
- 所以需要以某种方式标记出 struct 本身的「生命周期」必须和其引用字段的「生命周期」相匹配
- 在这个例子中,既然 RefWithFlag 的生命周期不能比 ptr_and_bit 字段的生命周期要长,我们需要对 RefWithFlag 的生命周期进行标记。但又不能对 usize 字段做标记,只能再加一个 PhantomData 引用字段,并把这个字段的生命周期和 RefWithFlag 的生命周期都标记为:’a
struct 的生命周期请参考:结构体的生命周期注解
Nullable Pointers
2 种空指针。分别由 2 个函数返回:
- std::ptr::null<T>:返回 *const T
- std::ptr::null_mut<T>:返回 *mut T
检查一个 raw pointer 是否是空指针的方法有:
- is_null 方法
- as_ref 方法或 as_mut 方法。分别用于检查 *const T 和 *mut T
Type Sizes 和 Alignments
使用 unsafe 时也会用到「类型大小」和「类型对齐」相关的知识。
对于 sized 类型,可以使用下面的方法获取其 size 和 align:
- 使用
std::mem::size_of::<T>()获取类型的 size - 使用
std::mem::align_of::<T>()获取类型的对齐数
类型的 size 一定是该类型的 align 数的整倍数。
而对于 unsize 的类型,它的 size 大小和 align 数不固定。
给几个例子:
1
2
3
4
5
6
7
8
9
10
11
12
13
14
15
16
17
// Fat pointers to slices carry their referent's length.
let slice: & [i32] = & [1, 3, 9, 27, 81];
assert_eq!(std::mem::size_of_val(slice), 20);

let text: & str = "alligator";
assert_eq!(std::mem::size_of_val(text), 9);

use std::fmt::Display;
let unremarkable: & dyn Display = & 193_u8;
let remarkable: & dyn Display = & 0.0072973525664;

// These return the size/alignment of the value the
// trait object points to, not those of the trait object
// itself. This information comes from the vtable the
// trait object refers to.
assert_eq!(std::mem::size_of_val(unremarkable), 1);
assert_eq!(std::mem::align_of_val(remarkable), 8);
Pointer Arithmetic
原则:在数组中,每个元素占用的 size 是 n,那么第 i 个元素的起始位置是第 i * n bytes。
raw 指针上有 2 个方法可以使用:
ptr.offset(i):获得 ptr 的偏移量为 i 的指针。这个方法可能引起 UBptr.wrapping_offset(i):和 ptr 类似,但 Rust makes no assumptions about the relative ordering ofptr.wrapping_offset(i)and ptr itself